

Cloudflare Compatibility
Introduction
If your site sits behind Cloudflare, its security features can sometimes block AAArdvark’s scans before they reach your pages. Not every site on Cloudflare blocks AAArdvark, so you only need this guide if your scans are being blocked or your site fails validation when you add it.
Letting AAArdvark Through Cloudflare
There are three ways to let AAArdvark past Cloudflare, depending on what your plan and setup allow. The first two use a Cloudflare rule. Cloudflare’s dashboard and the rule options available differ by plan, so follow Cloudflare’s custom rules documentation for the exact steps on your account. If you can’t create a rule in your Cloudflare account, see Managed Edge below.
Not every Cloudflare security feature can be bypassed by a rule. Cloudflare notes that Bot Fight Mode, for example, can’t be skipped. If AAArdvark is still being blocked after you set up a rule, check whether Bot Fight Mode is turned on for your site.
Custom Header (Recommended)
Every request AAArdvark sends to your site carries a header that’s unique to your site, both when adding your site and on every scan afterward. This makes the custom header the most reliable option, and it doesn’t depend on AAArdvark’s IP addresses.
- In AAArdvark, open your site’s Settings, select Customize Site Settings, and open the Allowlist Management panel.
- Copy your Header Key and Header Value. The Header Value is unique to your site, not a fixed value shared across all AAArdvark customers. Copy the one shown in your own Allowlist Management panel rather than reusing a value from anywhere else.
- In Cloudflare, create a rule that lets through requests where that header matches that value.
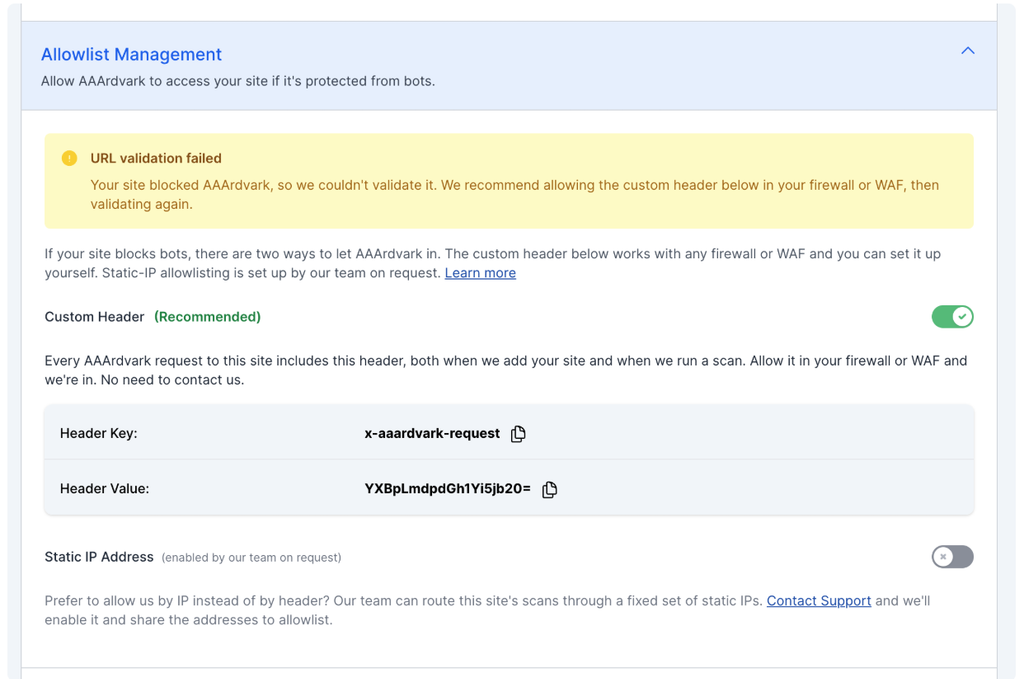
Once the rule is live, click Validate URL again on the Add a New Site page. You don’t need to save or start over first.
If you’re setting this up ahead of time rather than in response to a blocked scan, the Allowlist Management panel is available any time under Customize Site Settings.
Static IP (request-based)
If your Cloudflare setup can only allow traffic by IP address, contact our support team to request static IP allowlisting for your site. Once our team enables it, create a Cloudflare rule that lets through requests from these IP addresses:
- 34.171.8.12
- 24.199.66.145
- 35.225.6.166
- 138.197.231.162
Note: Static IP allowlisting covers your scans once it’s enabled, but not adding a site, which still comes from a different source. If you’re stuck at the add-a-site step, use the Custom Header option above instead.
If you run into issues, double-check that the IP addresses are entered correctly and that the rule is active. Contact support if you need further help.
Managed Edge (for a Cloudflare setup you can’t configure)
Use this option if you can’t create a rule in Cloudflare yourself. That includes sites on a managed WAF the site owner has no access to configure, most commonly a Shopify store using Shopify-managed Cloudflare.
Contact our support team and we’ll route your site’s scans through a residential proxy instead, so your scans don’t need to be allowlisted. There’s nothing to configure on your end.
Note: Managed Edge covers your scans, not adding your site. If your site is blocked while you’re adding it, mention that when you contact support.
Cloudflare’s Cache
If your site caches HTML through Cloudflare, a scan may pick up a cached version of a page instead of the latest version from your origin. If your scan results look outdated, try one of these:
- Automated cache purge. Use Cloudflare’s API to purge the specific URL as part of your deployment process, rather than purging everything. Developer assistance required.
- Manual cache purge. Purge the specific page’s URL right after deployment and before starting a manual scan.
- Webhook delay. If a webhook triggers your scans, add a delay in the webhook settings so the Cloudflare cache has time to refresh first.
For more on managing Cloudflare’s cache, see Cloudflare’s cache purging guide.