

Site Authentication
Introduction
Use this guide if your site needs a password or login before anyone can see it. Common examples: “my site is password protected,” “my staging site has a login,” “I have a members-only area,” or “the scan only shows my login page.” AAArdvark can sign in to your site first so it scans the real content behind the password.
When adding a new site to your AAArdvark Workspace, you might need to configure authentication settings to access protected pages. Setting this up takes two steps. The second one is easy to miss, and without it your scans still run signed out:
- Save your site’s login credentials using one of the authentication methods below.
- Tell AAArdvark which pages to log in for by setting those pages to “Log in before scanning.”
And, don’t worry, you can always update these settings later if needed.
To get started, go to your dashboard and click Add a New Site at the top of the page.
Setting up Site Authentication
AAArdvark allows you to log in before scanning, making it possible to test restricted or members-only content.
You set up the login once for the whole site, under Login & HTTP Authentication in your site’s settings. Then you choose which pages use it, one at a time or many at once.
Authentication Methods
AAArdvark offers four authentication methods: HTTP Basic, Login Form, Password Protected, and Custom Header.
HTTP Basic:
This method is often used for development sites that require a login for privacy. Your browser shows a pop-up asking for a username and password before the site loads. Just enter the username and password your site asks for.
If AAArdvark detects this kind of login when you add your site, you’ll see a “This site is password-protected” notice. Click Add your login credentials to switch to Customize Site Settings and jump to the Login & HTTP Authentication section, then open that section to enter your username and password.

Login Form:
For sites with a standard login screen, AAArdvark supports cookie-based authentication.
Password Protected:
Select this option if your site is password protected. You’ll need to enter the site password, the URL of your login page, the password selector (which identifies the password input field), and the submit button selector (which identifies the login button on your form).
Custom Header:
Select this option if your site or app lets a request through when it carries a specific header and value, such as an API token or a secret your developers set up for testing. You’ll enter:
- Header Name: the name of the header, for example
Authorization. - Header Value: the value that grants access, for example
Bearer your-token. This value is visible to anyone who can edit the site in AAArdvark, so treat it like a password and use it on a test or staging site where you can. - Test URL: a path on your site that requires the header. When you save, AAArdvark requests this page with the header attached. If the page doesn’t load successfully, you’ll see “Could not authenticate with the settings provided.”
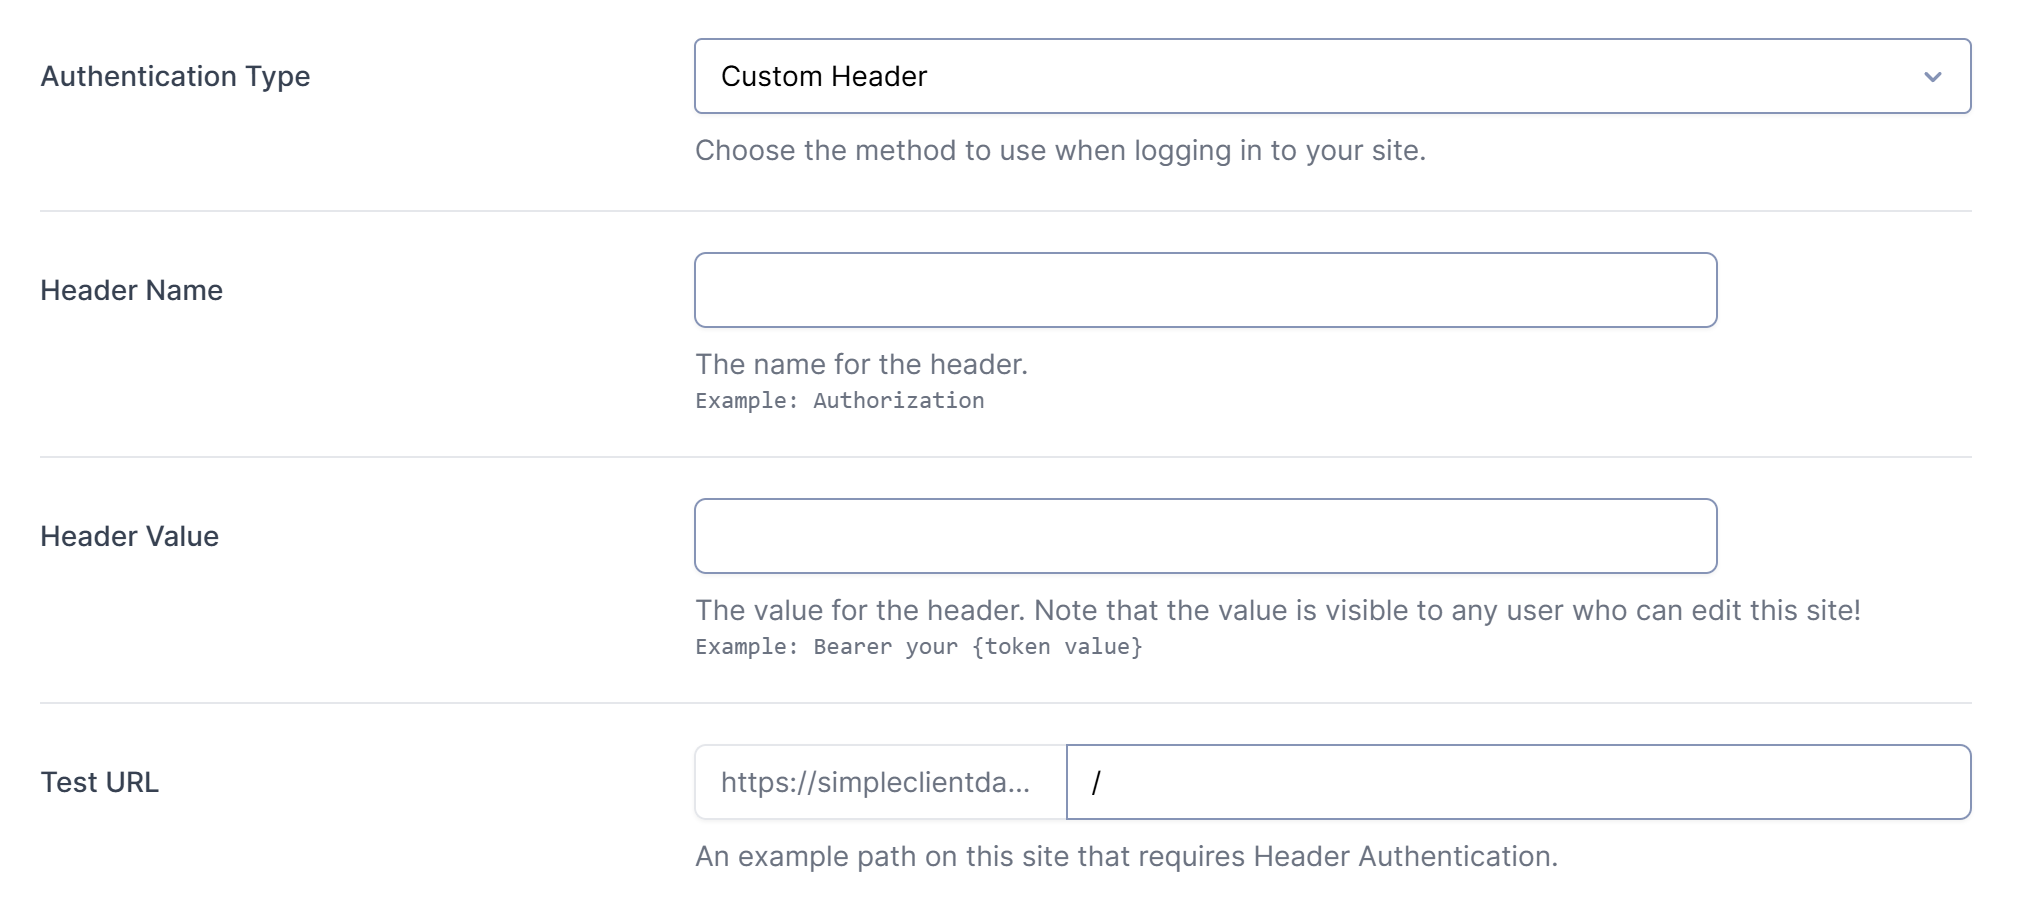
The header only works if your site is set up to accept it. If the scan still lands on your login page, check with your developers that a request carrying the header gets the real page instead of a redirect to the login. They can test it with a single command:
curl -sS -o /dev/null -w '%{http_code}\n' -H 'Your-Header-Name: your value' 'https://example.com/protected-page'
A 200 means your site accepts the header. A 302, 401 or 403 means your site isn’t accepting it yet, and the change needs to happen on your site’s side.
A successful save doesn’t prove the header works. When AAArdvark checks the Test URL, it follows redirects, so a site that sends the request to a login page that loads normally can still save without an error. Run the check above to be sure.
This is a different feature from the Custom Header in Allowlist Management, which helps you get past a firewall rather than a login. See Login Problems vs. Access Denied below.
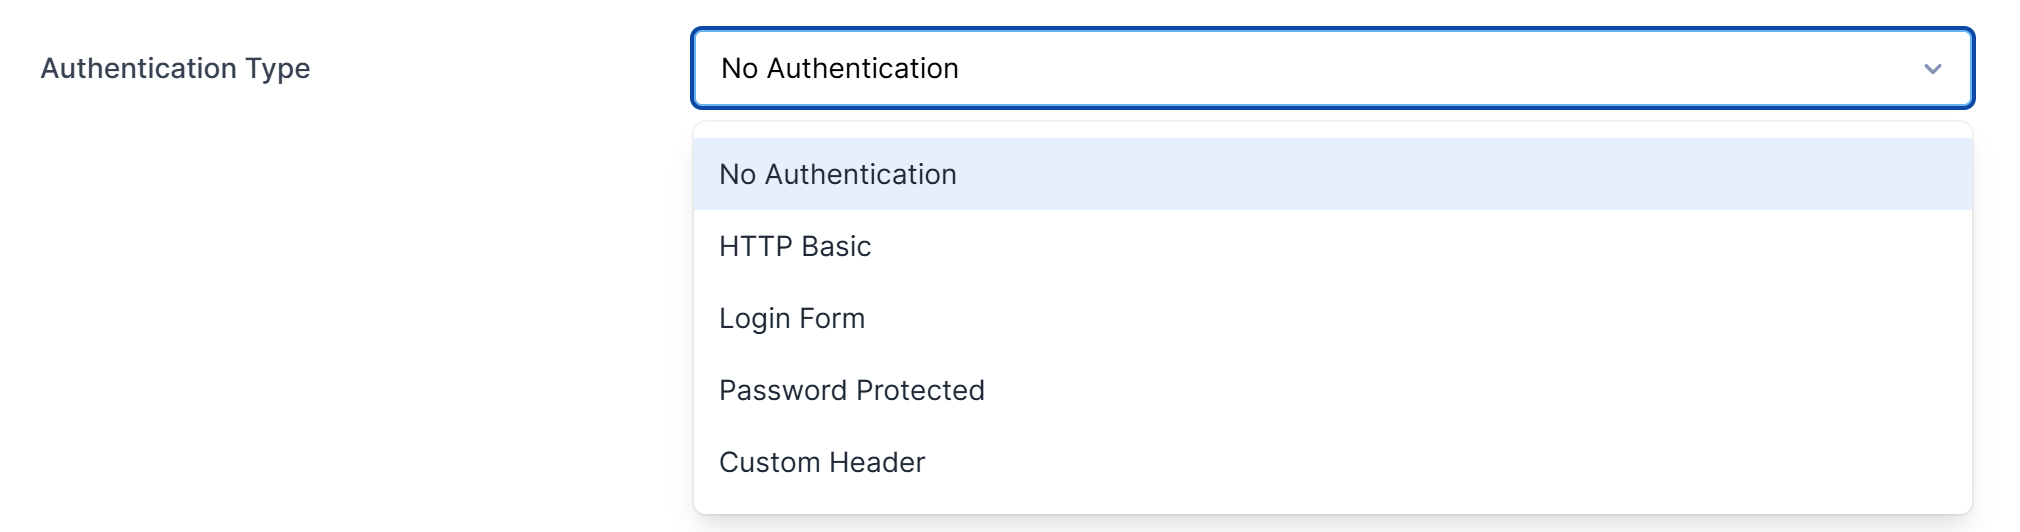
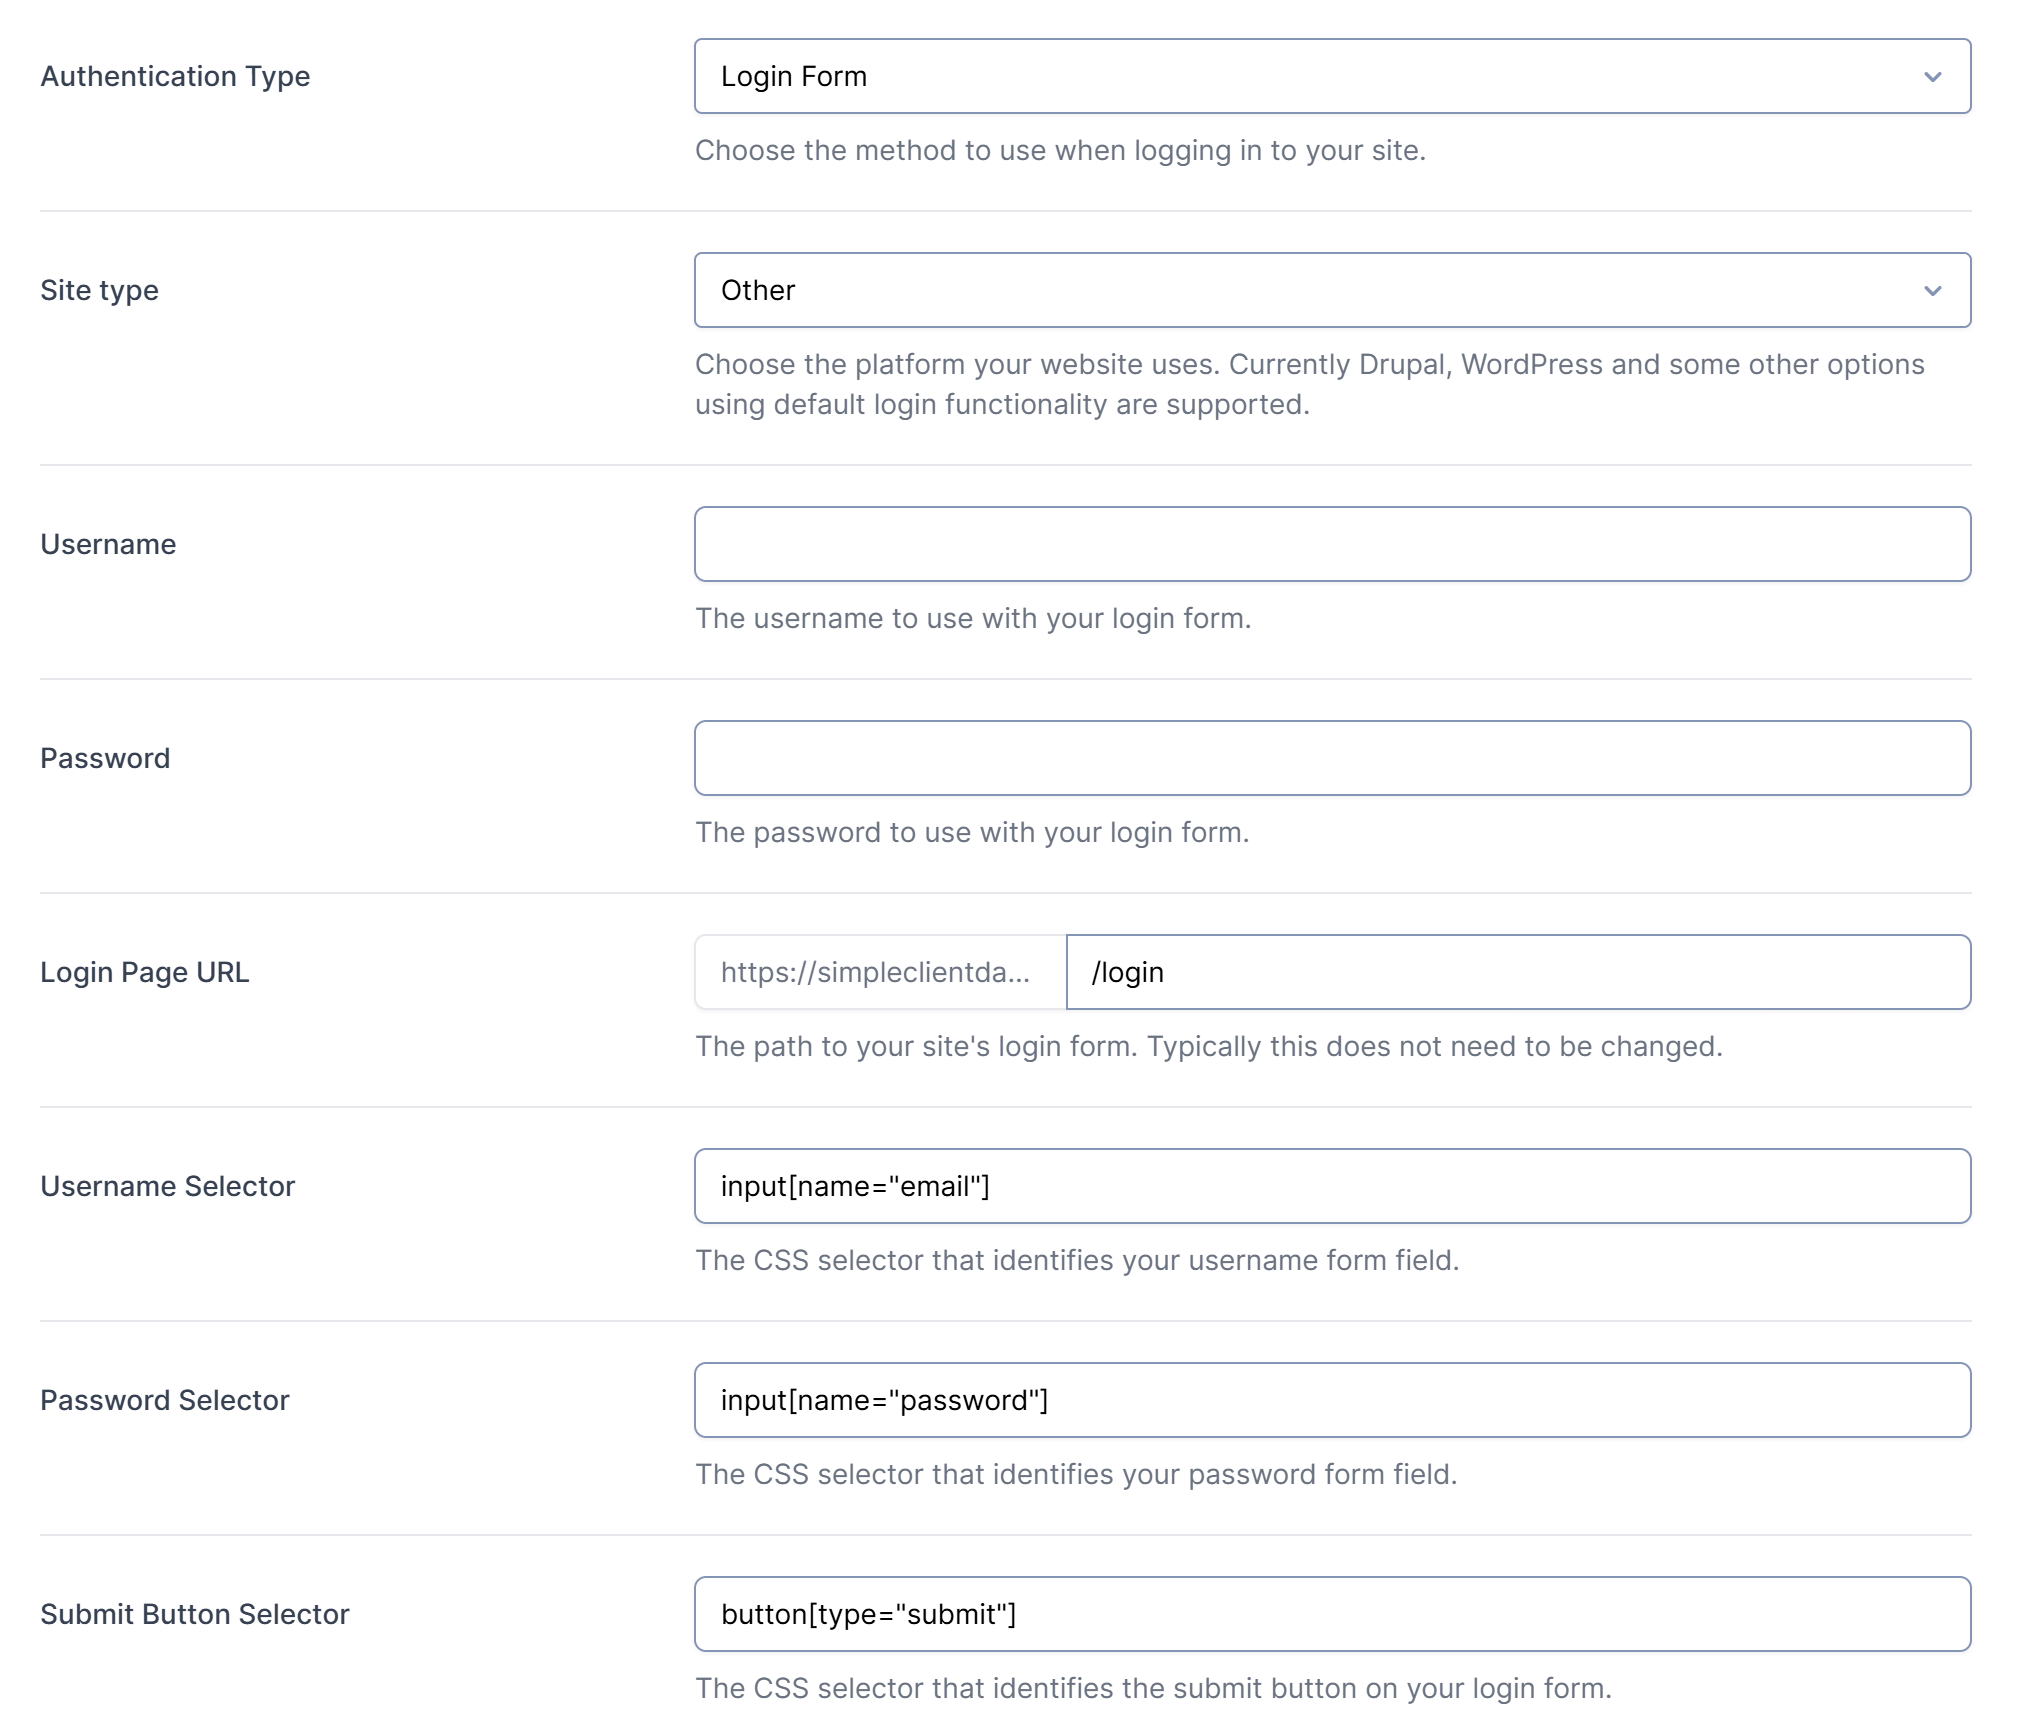
AAArdvark currently supports Cookie Authentication for WordPress, Drupal, and Pantheon Dashboard sites, plus other sites that use a standard username and password login form (choose Other as the site type). If you’d like to see support for another platform, submit a feature request.
To set up this method:
- Site Type:
Select the platform your site is built on (WordPress, Drupal, Other, or Pantheon Dashboard), then enter your username and password. - Username/Password:
AAArdvark stores your credentials securely using strong encryption. For added security, we recommend creating a dedicated user account with limited permissions for accessibility scanning. - Login Page URL:
The path to your site’s login form. This is filled in for you and usually doesn’t need to be changed.
Custom Login Pages
If you choose Other as the site type, you can update the username, password, and submit button selectors to match your login form.
AAArdvark does not support custom login pages for WordPress, Drupal, or Pantheon Dashboard sites.
Set Which Pages Require Login Before Scanning
Saving your credentials tells AAArdvark how to log in. The next step tells it which pages need that login.
You choose which pages need a login and which don’t, so a site can have both public and protected pages. Flag pages one at a time, or select several and flag them all at once.
After saving your credentials for the first time with no pages flagged yet, AAArdvark will show a prompt on the dashboard: “Login credentials saved. Now choose which pages should log in before scanning.” Click Choose pages to log in on to go straight to the Pages list. Until at least one page is flagged, scans run signed out and your credentials won’t be used.
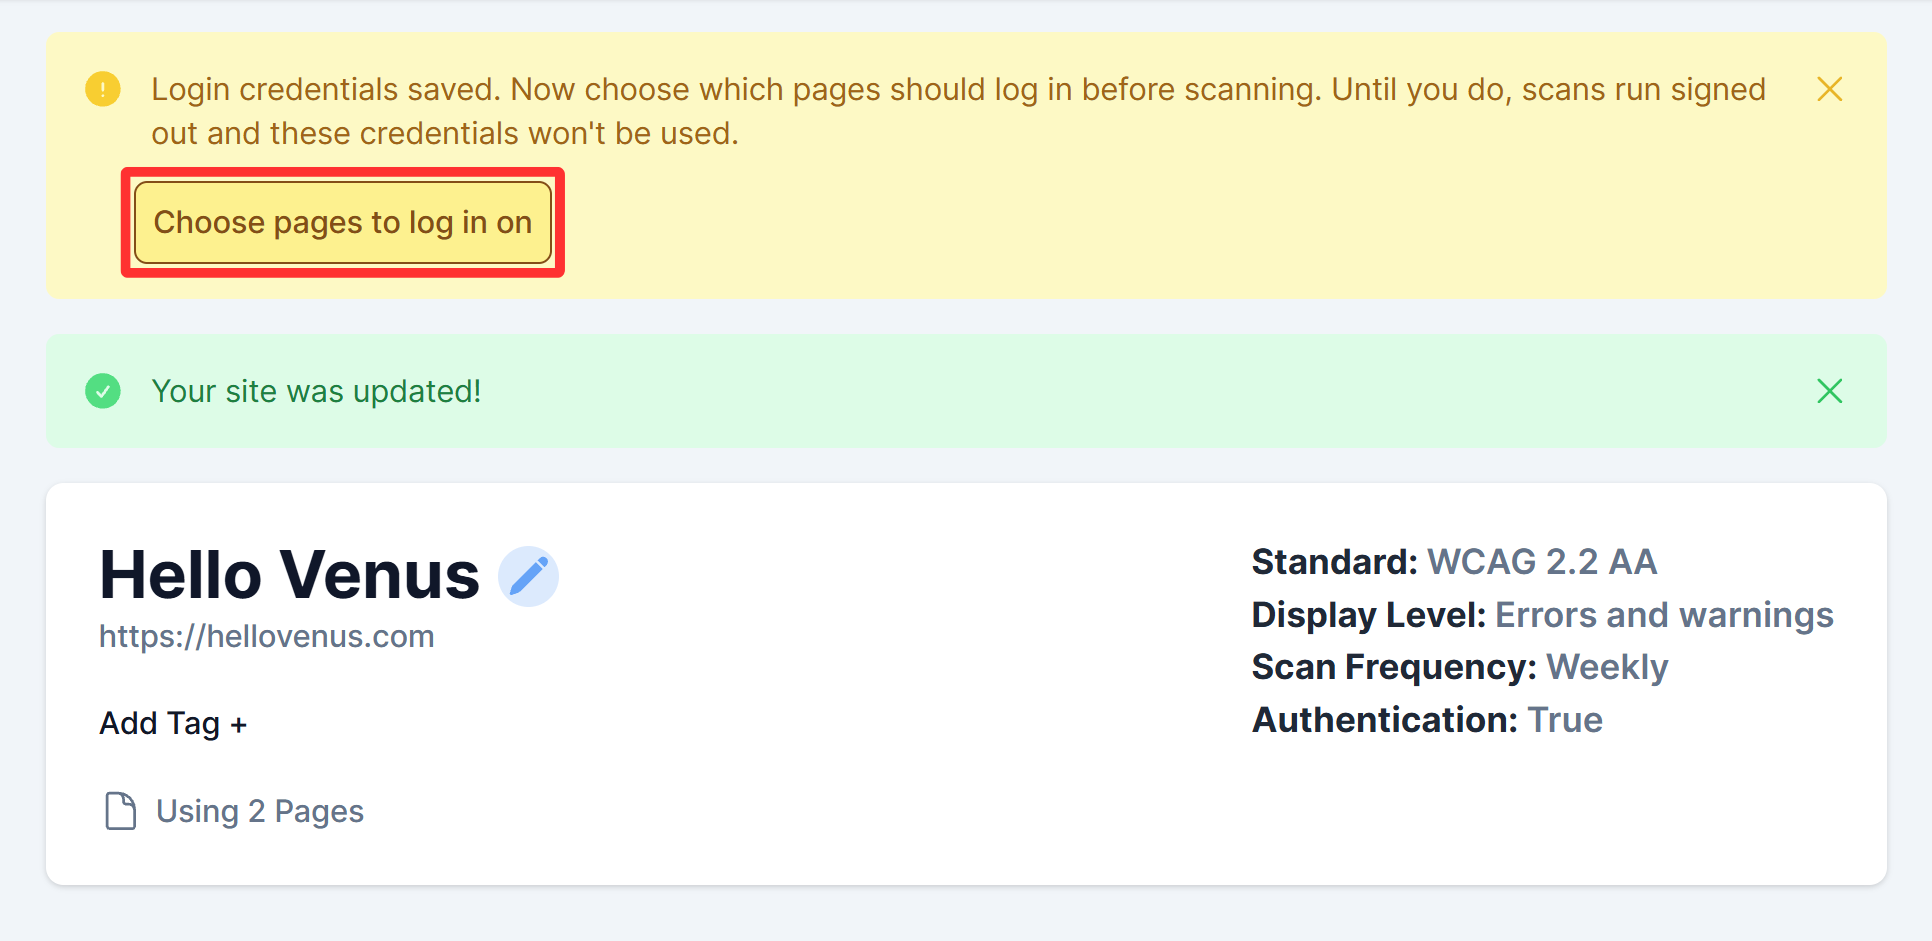
If you start a scan while credentials are saved but no pages are flagged, AAArdvark will show a “Scan without logging in?” warning. You can choose Choose pages to finish the setup, or Scan anyway to proceed for public pages.
Bulk Login Settings (Fast Path)
The Pages list also shows a persistent reminder: “Your login credentials are saved, but no pages use them yet.” It stays until at least one page is flagged, then clears automatically.
To flag multiple pages at once:
- Open the Pages menu in your site’s sidebar.
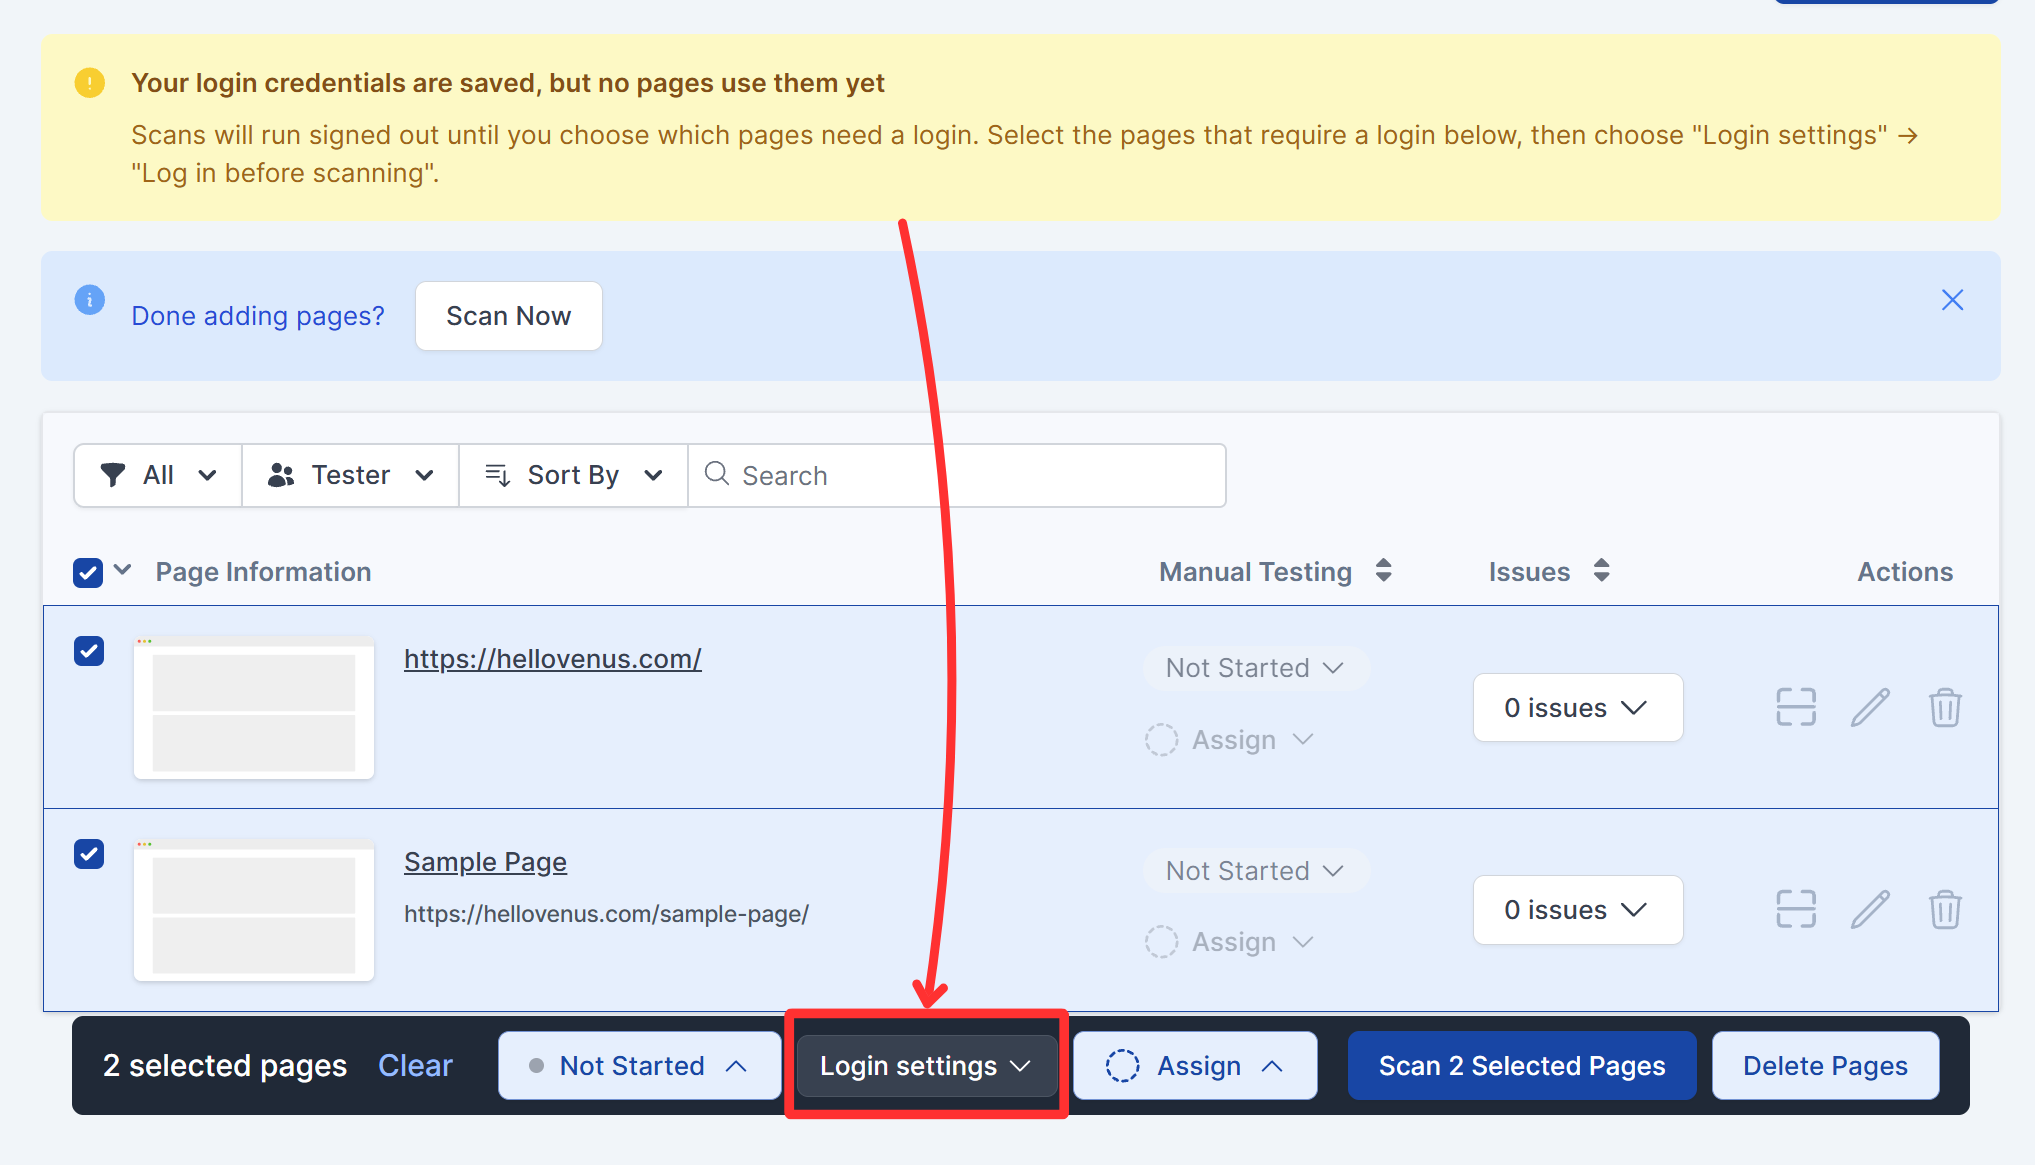
- Select the pages that require authentication using their checkboxes.

Pages list reminder banner, with two pages selected and “Login settings” highlighted in the bulk action bar. - Click Login settings in the bulk action bar, then choose Log in before scanning.

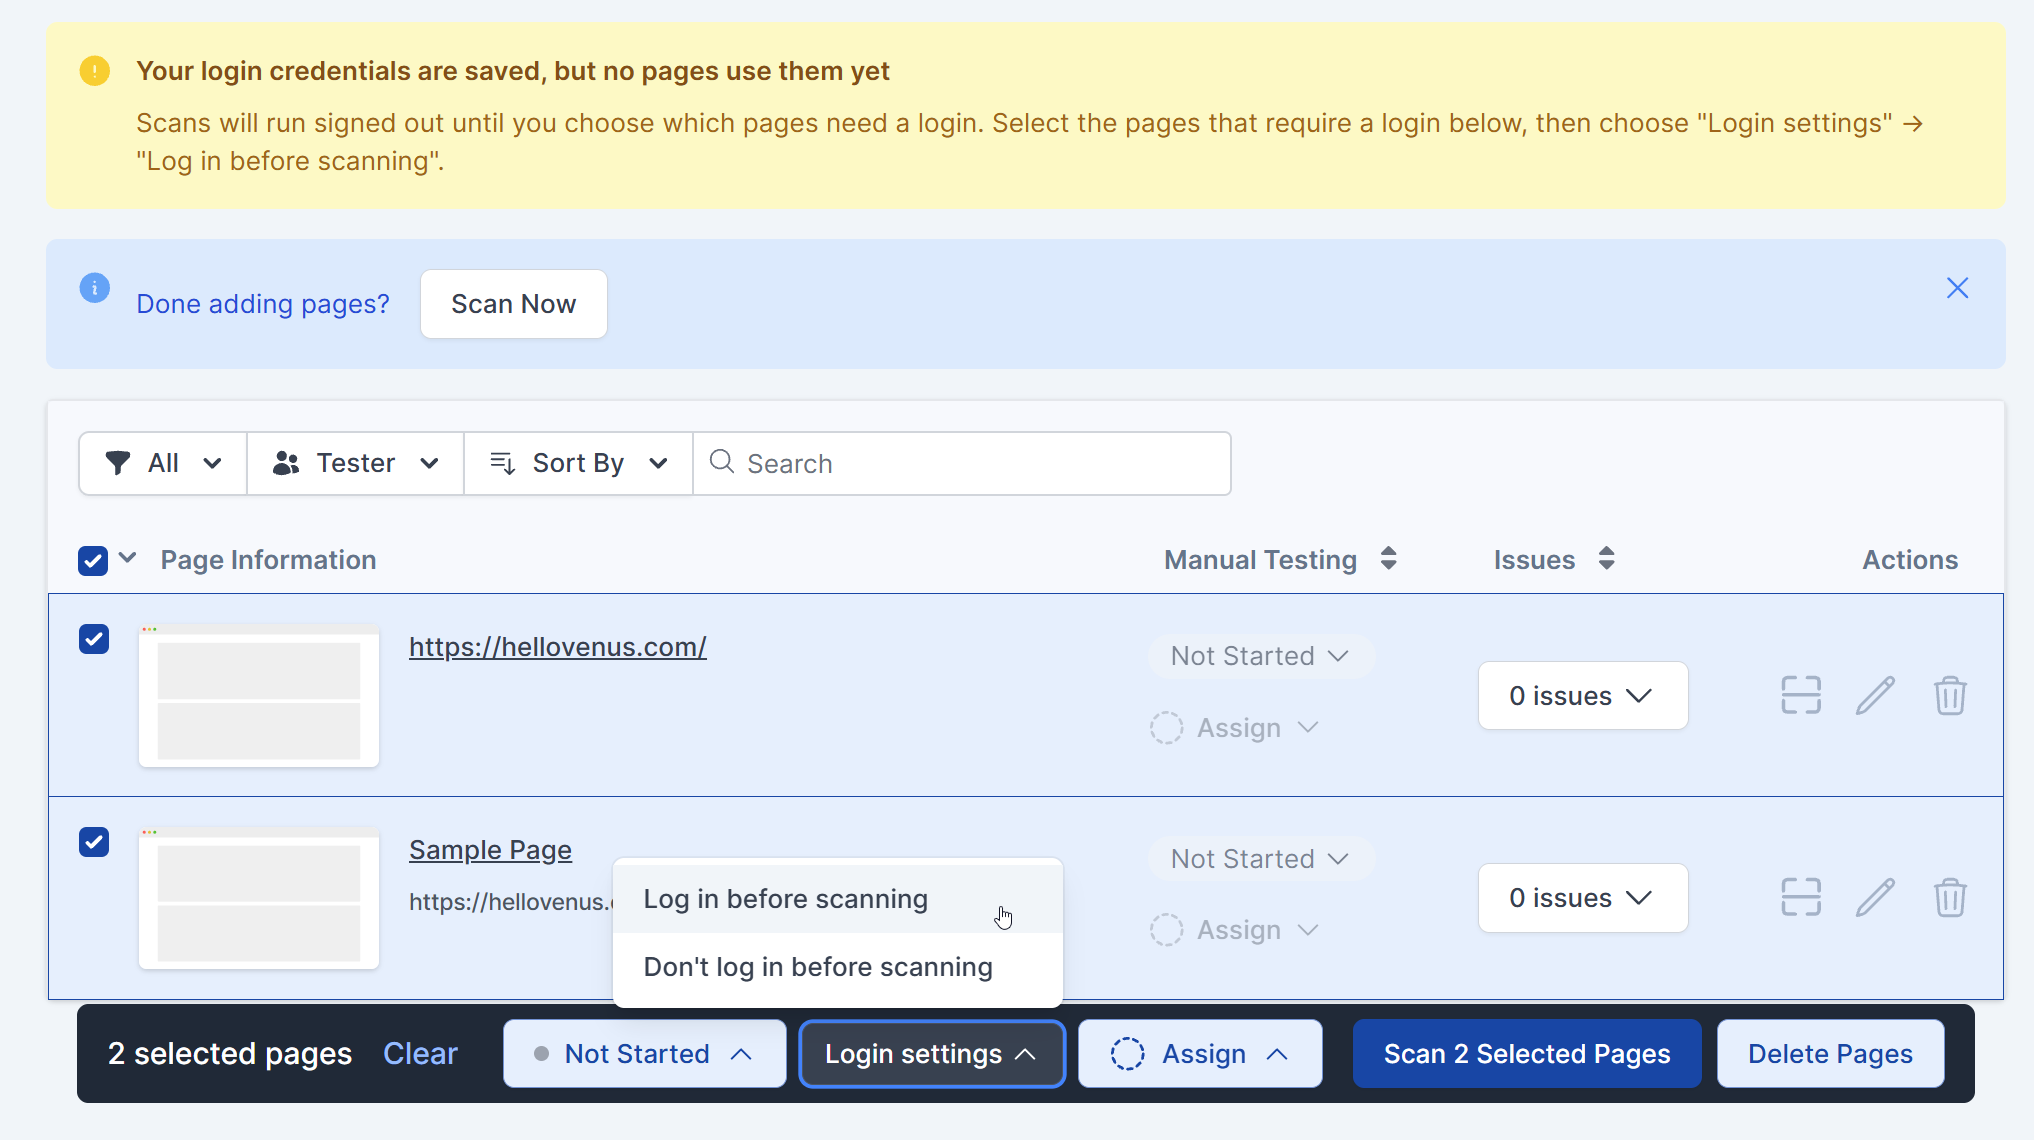
Login settings dropdown showing “Log in before scanning” and “Don’t log in before scanning”.
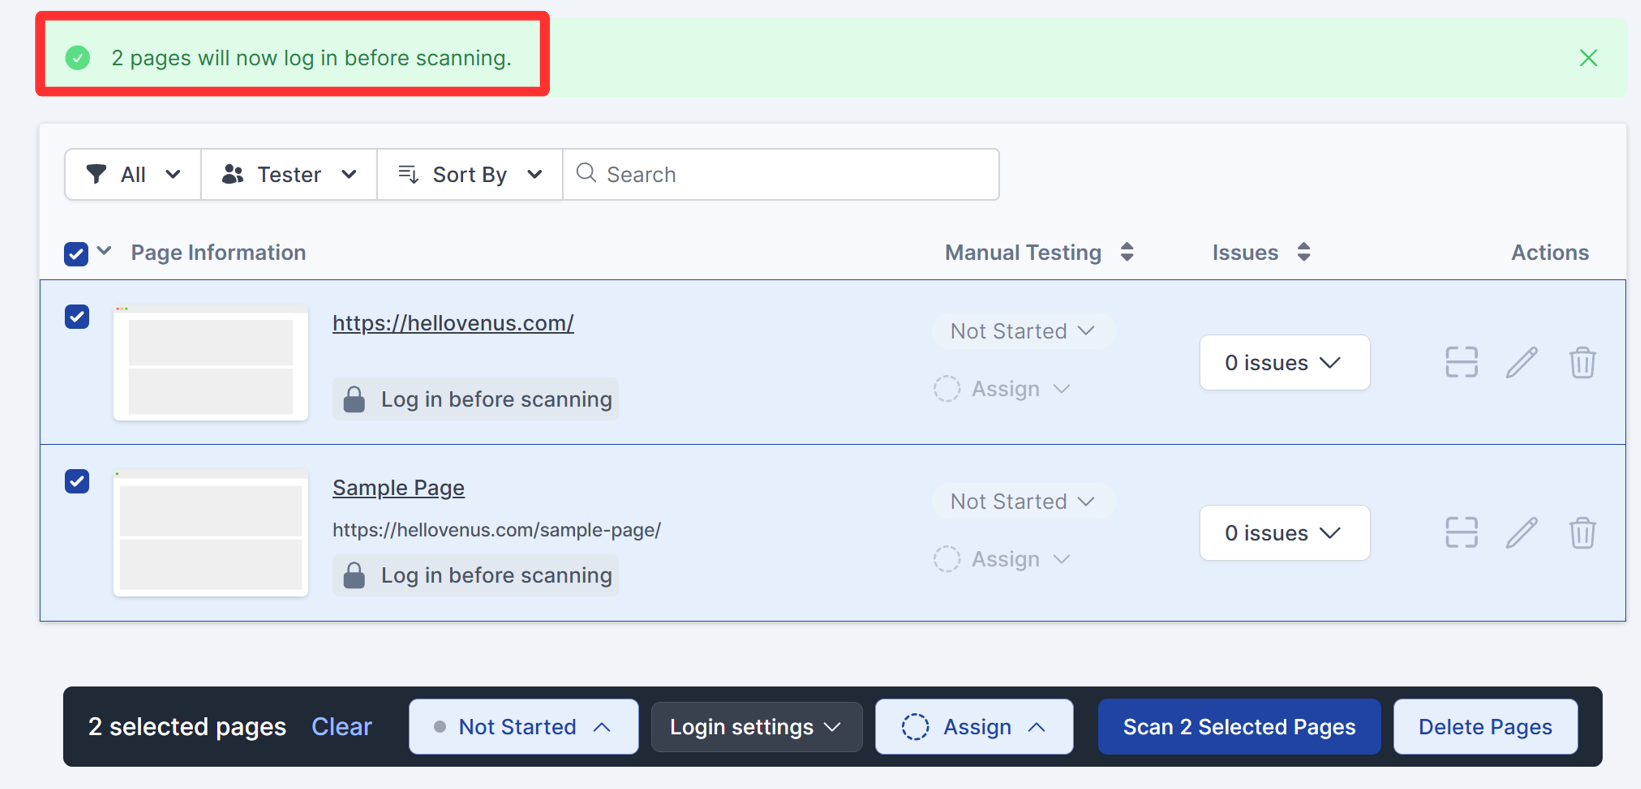
You’ll see a confirmation message: “N pages will now log in before scanning.” Each flagged page also shows a 🔒 Log in before scanning badge under its URL in the Pages list, so you can tell at a glance which pages are covered.
Setting Authentication Per Page
To turn it on for an individual page:
- Open the Pages menu in your site’s sidebar.
- Find the page that sits behind your login and click the pencil (Edit) icon in the Actions column.
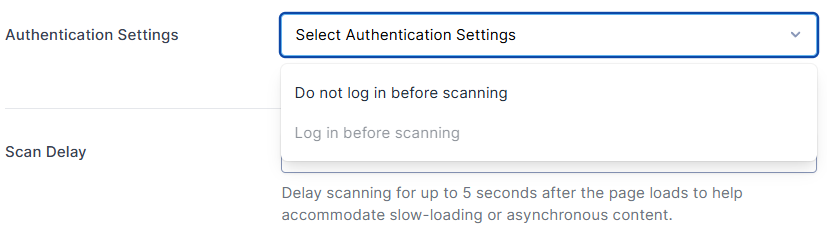
- In the Editing Page panel, open the Authentication Settings dropdown and choose Log in before scanning. (The default is Do not log in before scanning.) You absolutely need to have already set up the login for the site using the steps above before being able to select the option.
- Click Update.
Repeat for each protected page. If you’re adding pages manually, the New Page form has the same Authentication Settings dropdown, so you can set it as you go.
Quick check: if a public page scans fine but a members-only page comes back empty or blocked, it’s almost always a page still set to “Do not log in before scanning.”
If Your Scan Still Shows the Login Page
Work through these in order:
- Is the page set to log in? Open Pages and look for the 🔒 Log in before scanning badge under the page’s URL. Pages set to Do not log in before scanning scan signed out, even when your credentials are saved.
- Do the credentials still work? If AAArdvark can’t sign in with a Login Form or Password Protected login, the pages set to log in will show the error “Unable to authenticate with site credentials.” For HTTP Basic, a wrong username or password can show “The site rejected the authentication credentials.” or “This site requires authentication.” Try the same username and password on your site, then update them in your site’s settings.
- Using Custom Header? Make sure your site accepts the header, using the check in the Custom Header section above.
Sites That Use Single Sign-On or Two-Factor Login
None of the four methods can get through a single sign-on (SSO) screen like Microsoft Entra ID, Okta, or Google, or a two-factor prompt like a passkey or code. AAArdvark signs in from our cloud servers with no one there to approve the prompt. You still have options:
- Use a dedicated scanning account without two-factor. If your IT team can create an account that is excluded from two-factor login, try Login Form with Other as the site type. Some SSO setups also limit sign-ins to certain networks or devices. Because scans sign in from our cloud servers, not your office network, that account may need an exception to those rules too.
- Let AAArdvark skip the login on your server. If you control the server, you can set it up to let AAArdvark’s requests through without a login, either by its allowlist header or by a static IP address. See the Allowlist guide for the header and IP details.
- Ask us to set up a custom login. For sign-in flows the built-in methods can’t handle, our team can configure a custom login sequence for your site. Contact support and we’ll work through it with you.
Using Visual Mode? Visual Mode doesn’t use these settings. To browse and test pages behind a login there, follow the steps in Visual Mode: Pages with Authentication. Automated scans still need one of the options above.
Login Problems vs. Access Denied
These two problems look alike but have different fixes:
- Your scan shows a login page instead of your content. AAArdvark reached your site but wasn’t signed in. Make sure your login credentials are saved and the page is set to Log in before scanning. If both are done and the scan still shows the login page, work through If Your Scan Still Shows the Login Page above.
- You see an “Access Denied” error when adding your site or changing its URL. Your site refused the request. Most often a firewall or security tool, such as Cloudflare, blocked AAArdvark. Follow the Access Denied allowlist guide.
If a page scan fails, the page shows its own error in the Pages list:
- “This site requires authentication.” The page needs a login. Save your credentials and set the page to log in before scanning, as shown in this guide.
- “The site rejected the authentication credentials.” AAArdvark tried to sign in, but the username or password was wrong. Check them in your site’s settings.
- “This site is blocking our scanner.” This is a firewall or security block, not a login. Follow the Access Denied allowlist guide.
AAArdvark has two features called “Custom Header.” The one in Allowlist Management is a header AAArdvark sends with every request so your firewall can let it in. The Custom Header login method in this guide sends a header and value you choose, only on pages set to log in before scanning, so your site treats the request as signed in.