Adding Pages to a Site
Introduction
AAArdvark makes it easy to add pages to your site, whether you’re using a sitemap for bulk uploads or manually adding individual pages. The features you can access depend on your plan, so this guide will walk you through all the options to get started quickly.
What’s a sitemap?
A sitemap is like a blueprint for your website—it lists all your site’s pages and their structure. By uploading a sitemap to AAArdvark, you can easily view and add multiple pages at once, saving time and effort.
Add the Site
Before you can add pages, make sure your site is set up in AAArdvark. If you’re unsure how to do this, check out our Site Configuration Guide.
Page Limitations by Plan
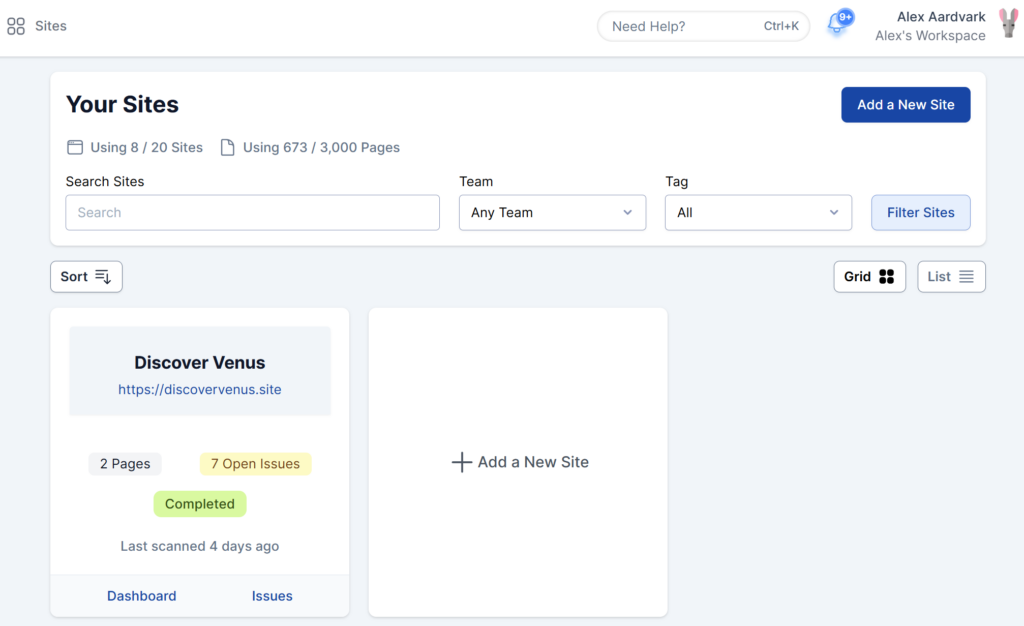
Each AAArdvark Workspace plan includes a set number of pages and sites.
The first site and page are free, but upgrading your Workspace Plan lets you scan and audit additional pages and sites. Check out the AAArdvark Workspace pricing.
Homepage Only Settings
If you’re using the single Homepage Only plan, after adding a site, you’ll have access to the Homepage Settings menu item in the sidebar. Navigating to this page will let you:
- Edit the Base URL Path for the site by clicking on the “I understand, unlock editing” button
- Enable Authentication Settings in case a login is necessary to scan the page
- Set a Scan Delay to help with pages where the scan is not fully capturing all the elements due to slower loading speeds
To test more than the homepage for your site, you’ll need to upgrade to add more pages.
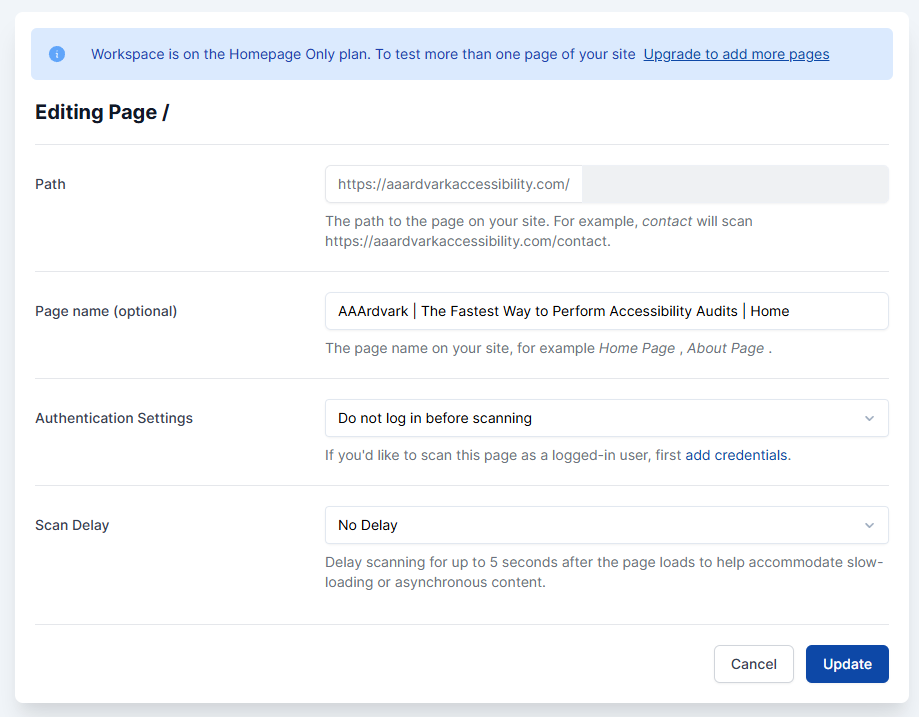
Editing Homepage
To edit the Base URL Path, click on the “I understand, unlock editing” button and enter the slug for the new Homepage. Please note that this should only be used if the homepage changes location, for example, when a subdirectory is added.
Pages Overview
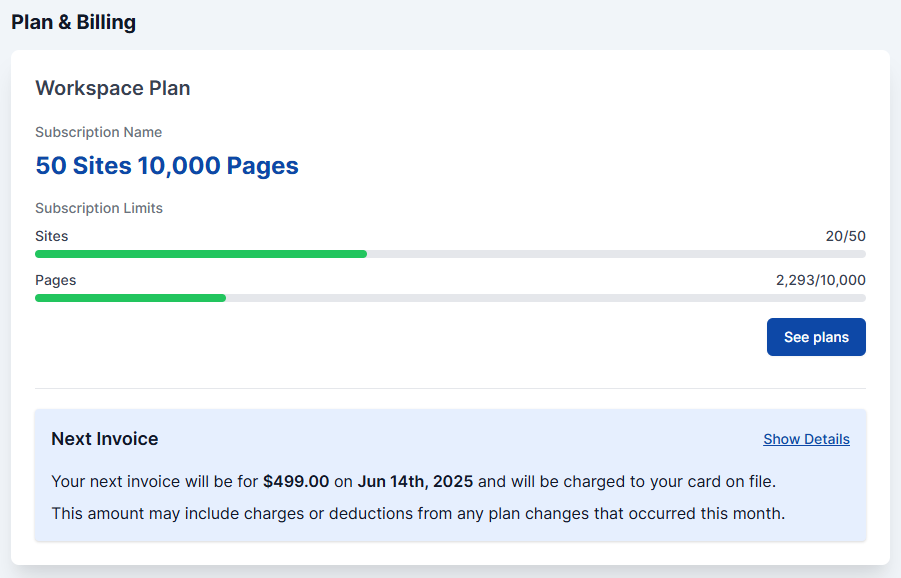
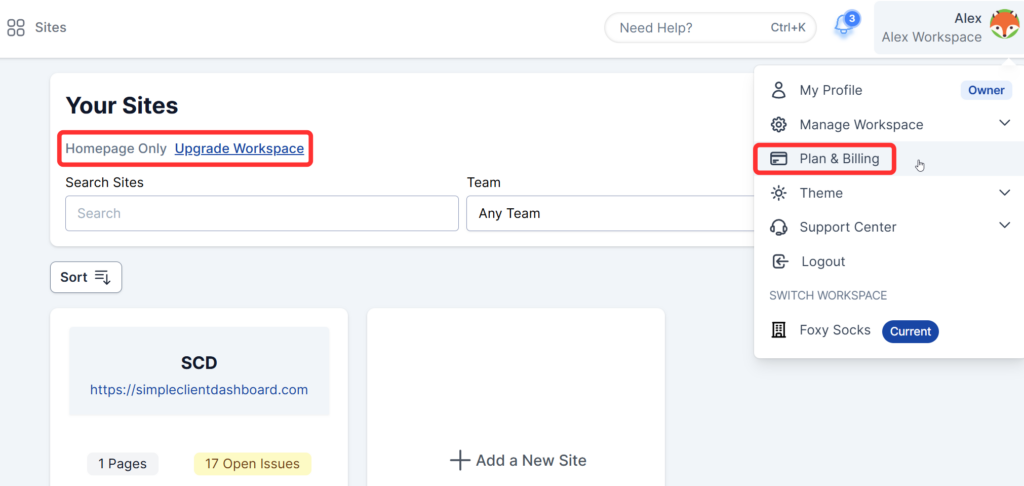
After adding a site, your homepage will be added automatically. But if you’d like to add more pages, you can begin the plan upgrade process from your site dashboard. Either click on the Upgrade Workspace link in your Dashboard, or open the User Menu and visit the Plan & Billing list item link.
Visit the Plan & Billing guide for more information on upgrading plans.
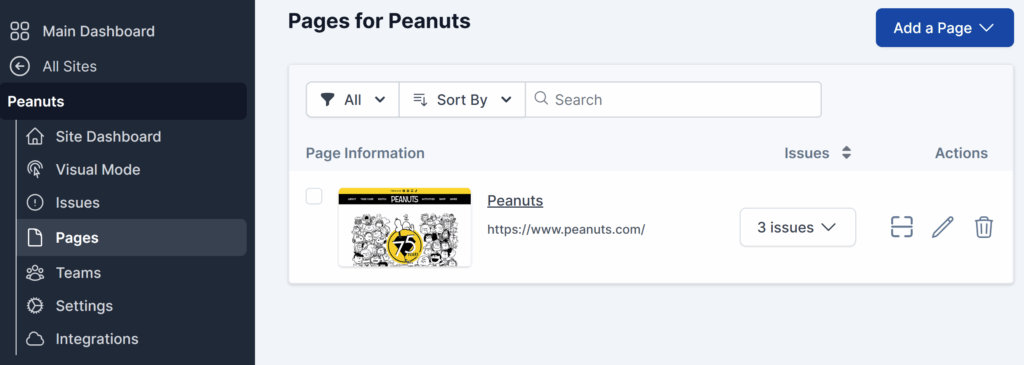
Pages Page
Once your site plan is upgraded, head back to the Site Dashboard and click on the new Pages menu item in the sidebar. The old Homepage Settings tab will be replaced with the new Pages menu item.
From the Pages page, you’ll be able to see a list of all the pages included for your site, and when you first visit, it’ll show your homepage in the table.
From the Pages page, you can:
- Filter your pages
- Search for a page
- Add a page via Sitemap or Manually
- Open issues in Visual Mode or List View
- Scan a single page or a subset of pages
- Edit or Delete Pages
Page Listings
Each page listing includes a few actions and useful links to their related issues.
Page URL
When clicking the URL, you can choose to either open the page in a new tab or view it in visual mode.

Page Listing Actions
Within the Actions column for each listing, you can scan, edit, or delete the page.
Use the Scan Icon to start scanning the single page you selected, the pencil icon with the Edit Page link to edit the Page Path, add Authentication Settings, or set a Scan Delay, or the trash can icon with the Delete Page button to remove this from the AAArdvark site plan and scope.
Also, if you select multiple pages with the checkbox, you can scan a subset of pages.
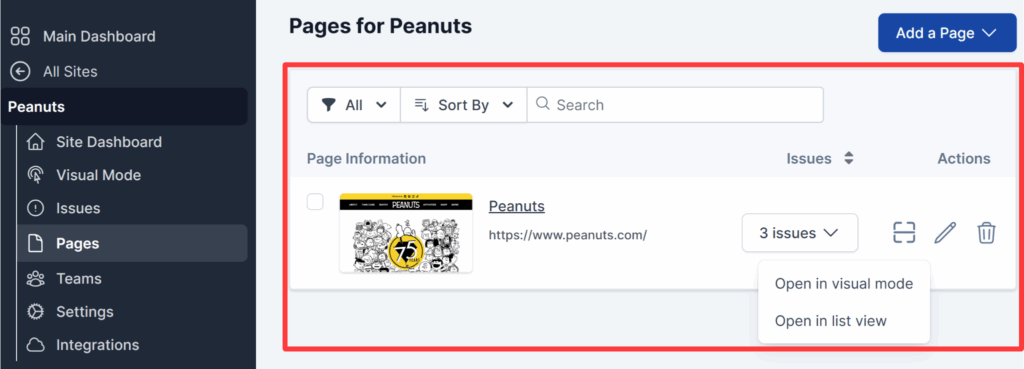
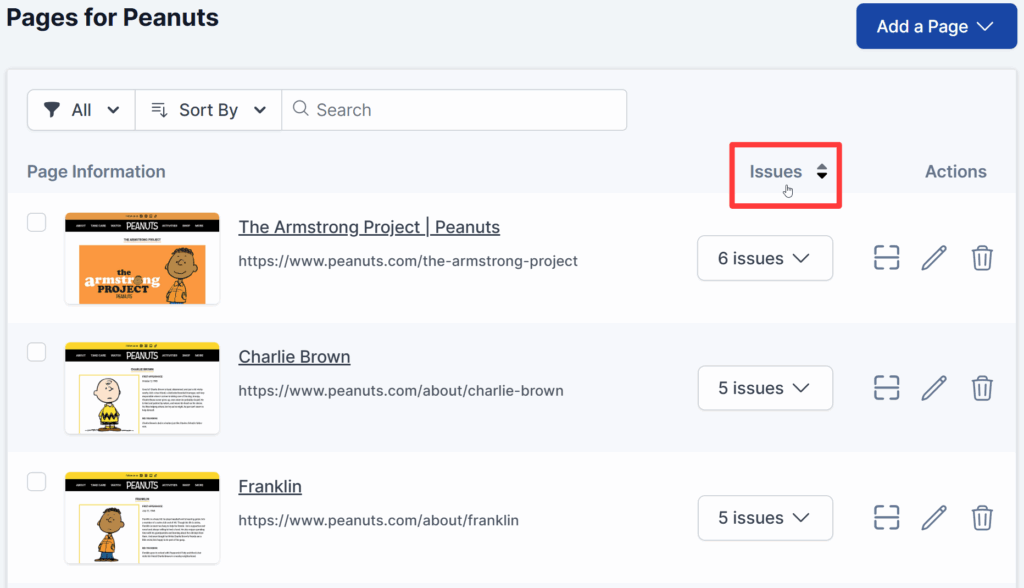
Page Listing Issues
The Issues column includes an Issues menu button for each page listing where you can see at a glance how many Issues each page has. Clicking the menu button shows you items for Open in Visual Mode, and for Open in List View. These will take you to the respective issue viewing pages with that specific page already pre-selected.
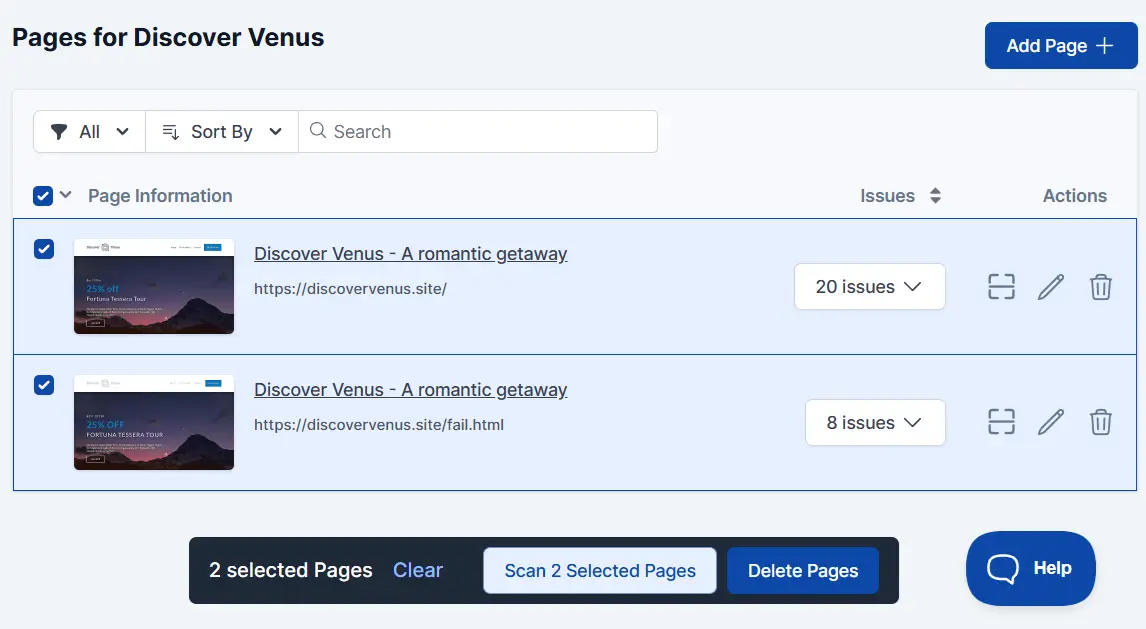
Batch Selecting Pages
Pages can be batch-selected by selecting the checkboxes next to them, or the top-most checkbox to select everything. With this, multiple pages can be scanned or deleted at once.
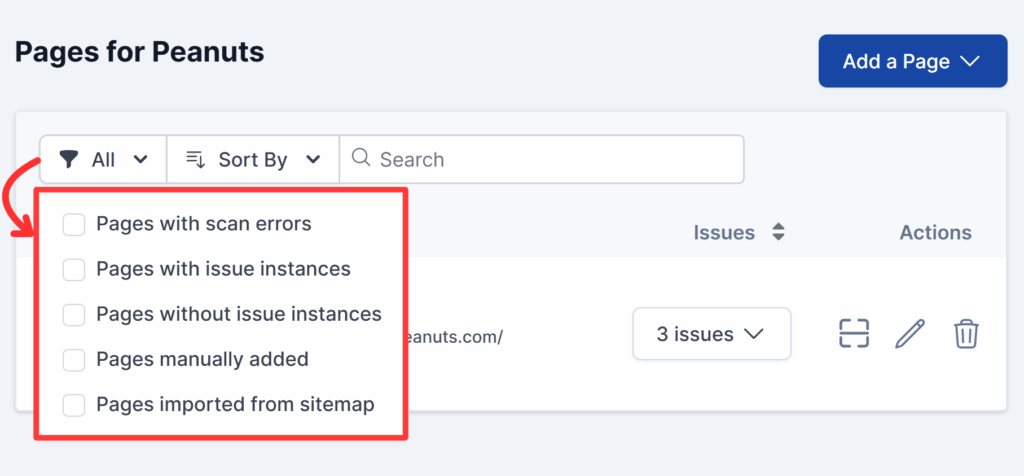
Filter Pages
Select the All button at the top-left corner of the Pages listing table to use the filter checkboxes. Filters for the pages include:
- All
- Pages with scan errors
- Pages with issue instances
- Pages without issue instances
- Pages manually added
- Pages imported from sitemap
Sorting Pages
The pages listing table allows you to sort pages by issue count or by using the sort filter options listed below:
- Page Path (A-Z)
- Newest
- Oldest
- Page Name (A-Z)
Sorting by Issues
Click the Issues column header to sort pages in ascending or descending order based on the number of issues per page.
Sorting By Filters
Click the Sort By button to sort pages using any of the filter options.
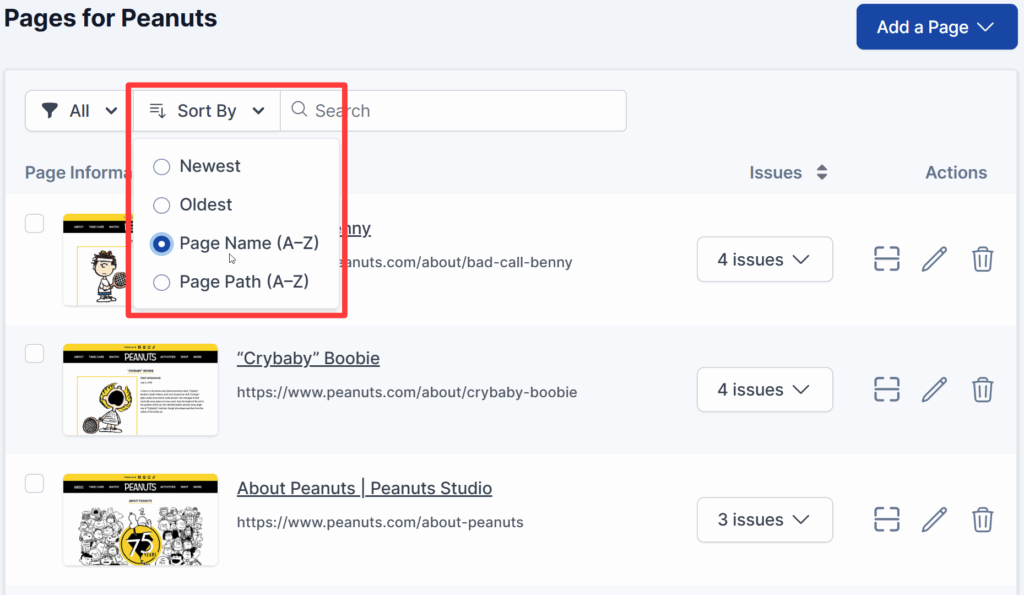
When a new sorting option is selected, the previously applied sorting is automatically cleared. Only the most recently selected sorting option will be active.
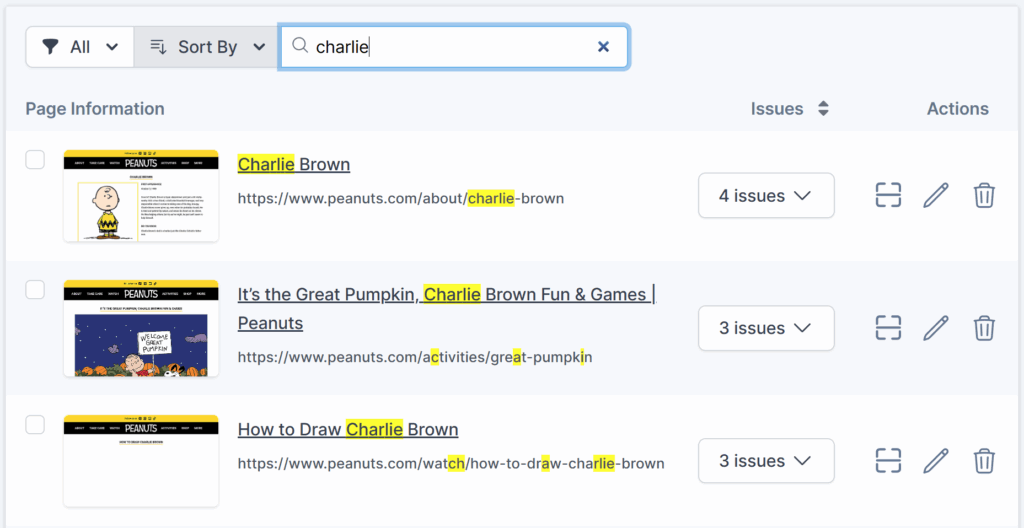
Searching Pages
The Search Pages bar helps you find pages by their slug. Enter a search term, and you’ll immediately see the results for matches. The matching words or letters will also be highlighted in yellow.
Adding Pages to a Site
AAArdvark lets you add pages using two methods: From Sitemap and Manually. The Sitemap option is best for adding pages in bulk, while adding pages manually lets you add a single specific page at a time.
Only upgraded workspaces with paid plans can add more pages to a site.
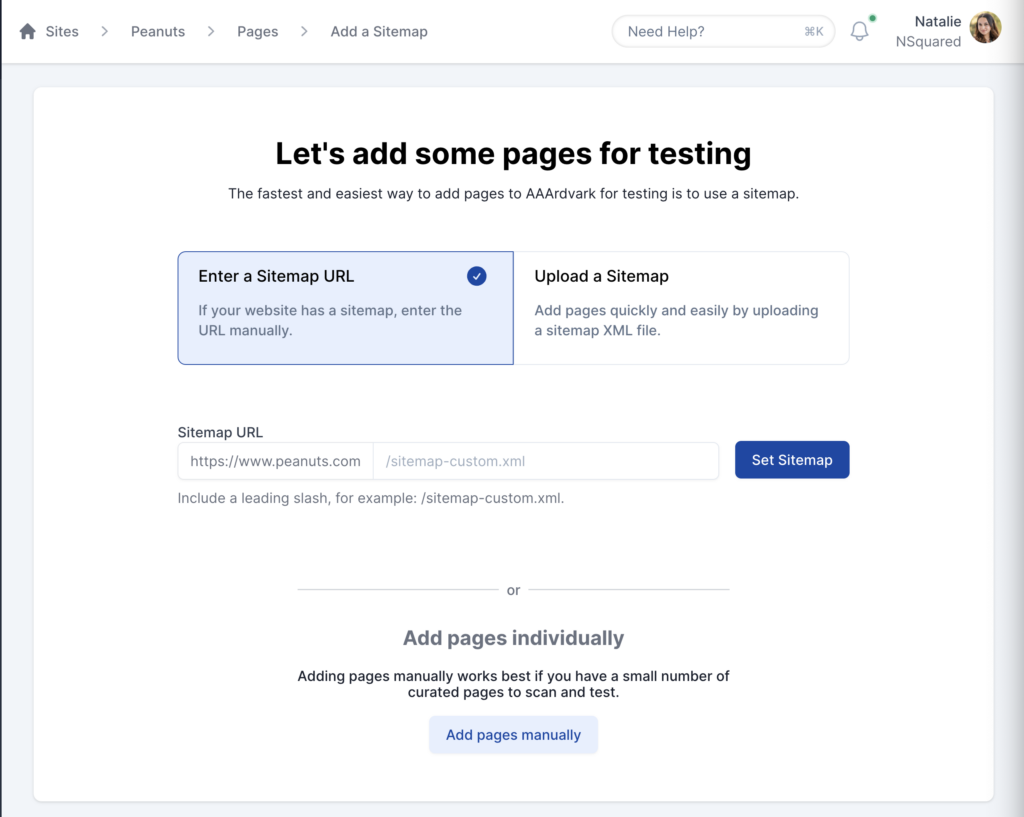
Uploading a Sitemap
To upload a sitemap:
- Click the Add a Page menu, then select Upload Sitemap.
- On the Add a Sitemap page, choose one of these options:
- Auto-detect a Sitemap: If your site uses a standard sitemap file (e.g.,
sitemap.xml), AAArdvark will detect it automatically. Click Use Sitemap to proceed. - Enter a Sitemap URL: Paste the link to your sitemap file and click Set Sitemap.
- Upload a Sitemap File: Select an XML file from your computer (up to 10MB).
- Auto-detect a Sitemap: If your site uses a standard sitemap file (e.g.,
Once the sitemap is uploaded, you can start adding pages to your plan!
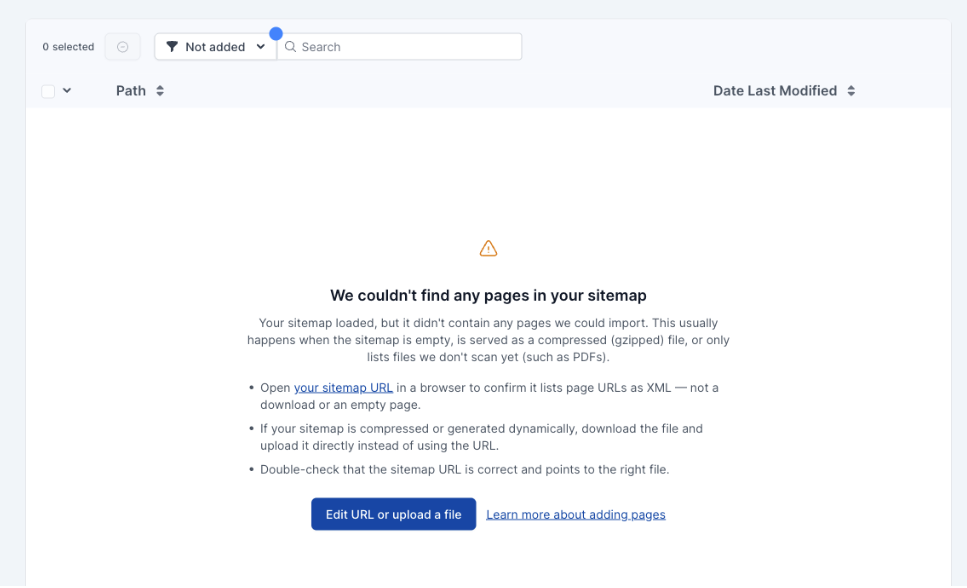
Empty Sitemap State
If your sitemap uploads successfully but no pages appear in the list, AAArdvark will display an empty-state message with troubleshooting guidance. This usually means the sitemap is valid, but the pages could not be retrieved.
If you see this message, try the following steps:
1. Open your sitemap URL in a browser to confirm it lists page URLs as XML — not a download or an empty page.
2. If your sitemap is compressed or generated dynamically, download the file and upload it directly instead of using the URL.
3. Double-check that the sitemap URL is correct and points to the right file.
Add Pages From Sitemap
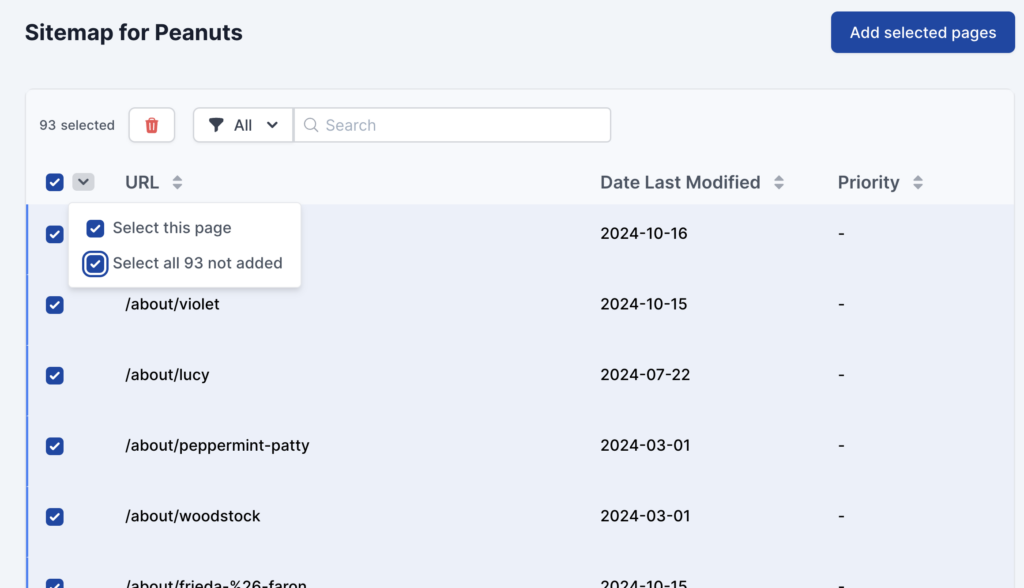
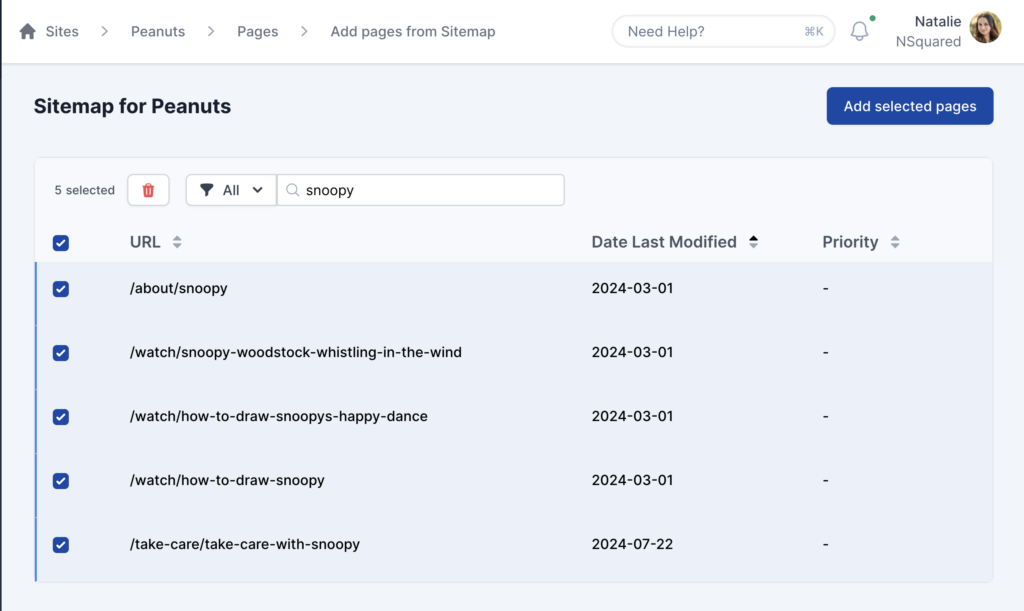
On the Add Pages From Sitemap page, you’ll see a list of pages from your uploaded sitemap. To add pages:
- Use the checkboxes to select the pages you want to include in your scans.
- Click the Add Selected Pages button to add your pages.
Add All Pages Not Added
If your plan allows, you can also add all remaining pages by selecting the Add All Pages Not Added option. This is perfect for larger sites!
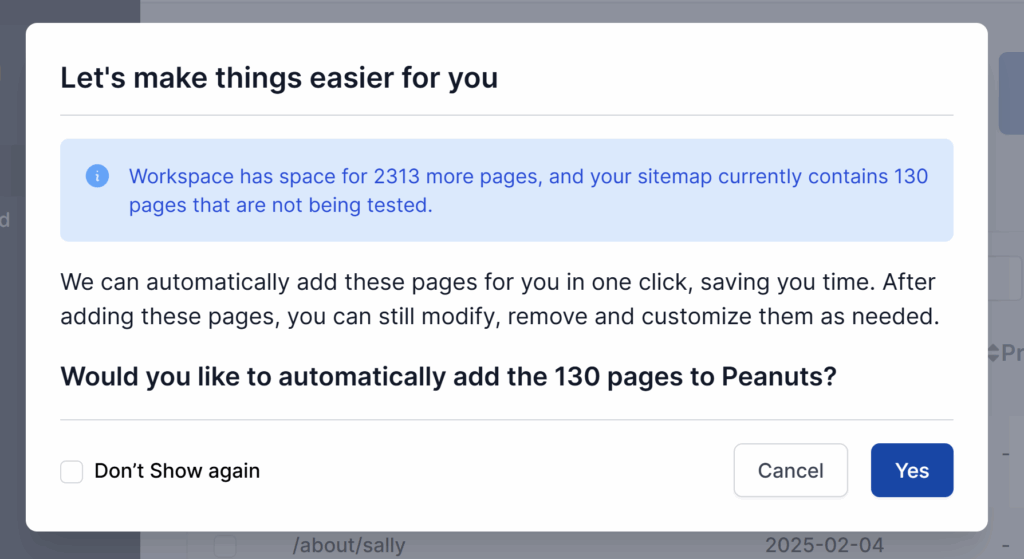
If you don’t see this popup, you can still add all the remaining pages by using the Select All menu button and checking the box for Select All not added.
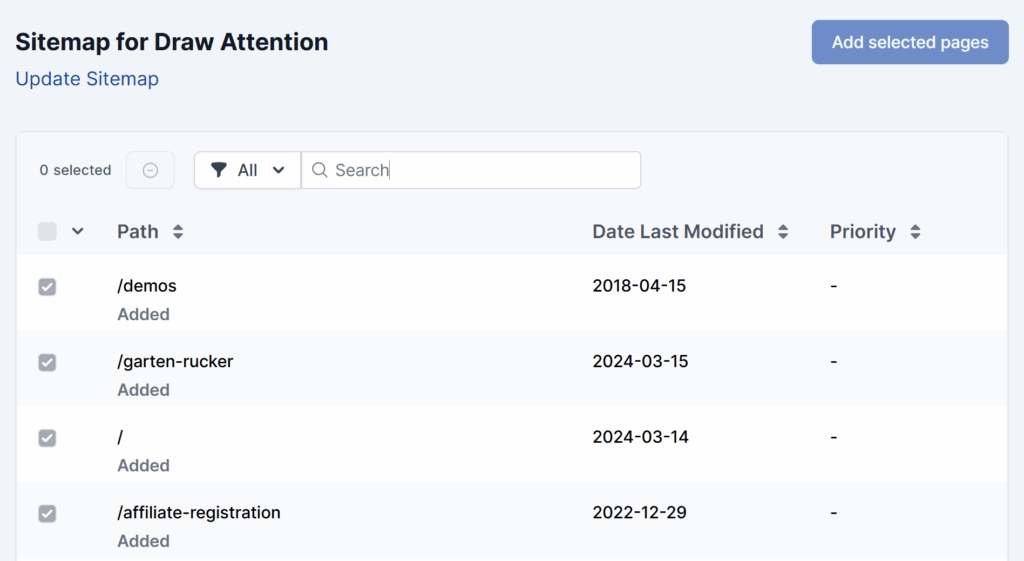
Added Pages
Once the pages are added to AAArdvark, the page listing will be shown alongside a paragraph that says Added. Also, the checkbox for those added pages is disabled and non-clickable.
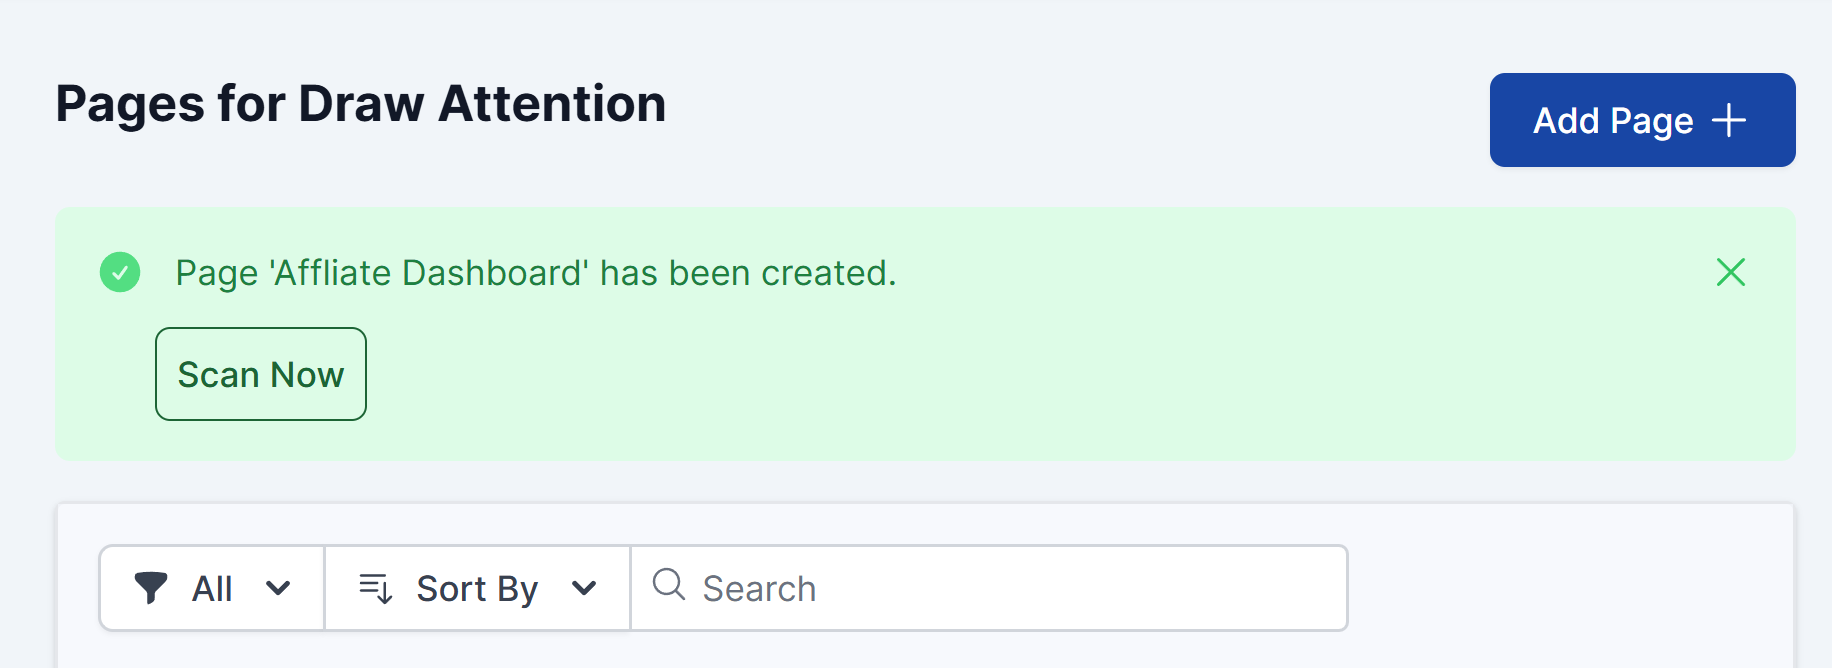
Scan Now Prompt
After adding pages via the sitemap flow or manually, a prompt will appear at the top of your Pages list with the option to start a scan right away.
This is a quick way to kick off a scan right after expanding your page coverage. If you’re not ready to scan yet, you can dismiss the prompt and start a scan later from the Pages list.
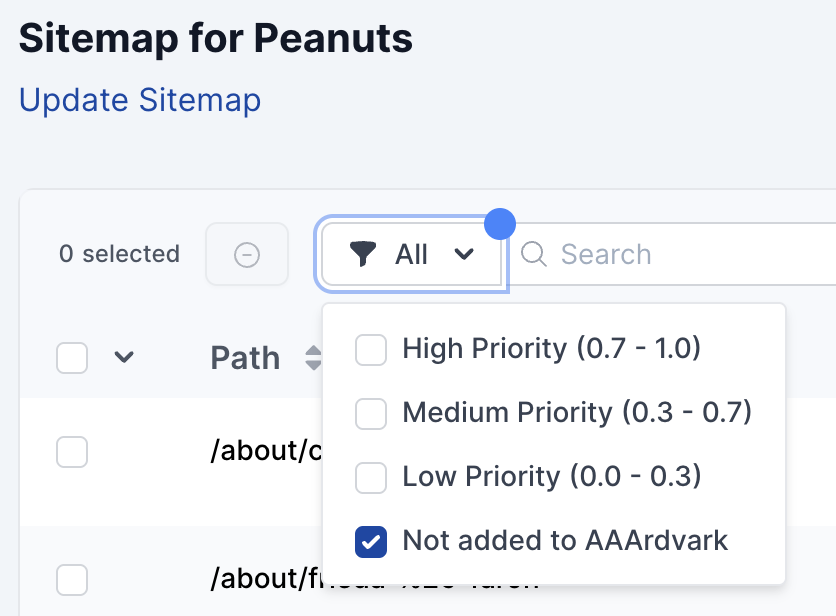
Filter, Sort, and Search From Sitemap
From this page, you can also Filter the pages by priority order or by whether they’ve been added to AAArdvark. By default, the Add Pages From Sitemap page is set to filter by pages Not Added to AAArdvark.
You can also use the Date Last Modified and Priority columns to sort the pages. And you can search for pages.
Lastly, you can use the trash can icon, which is also the Remove all items button, to clear all your checkbox selections. This does not delete pages or sitemap entries.
Priority and Date Last Modified
The Priority and Date Last Modified columns in the Sitemap page listing come from your XML file attributes. Both of these attributes are optional for XML files, so they may be blank.
- Priority values range from 1.0 – 0.0, where 1.0 is the highest priority
- Priority usually defaults to 0.5
Add Pages Manually
Want to add specific pages one at a time? Here’s how to do it manually:
- Click the Add a Page menu, then select Manually.
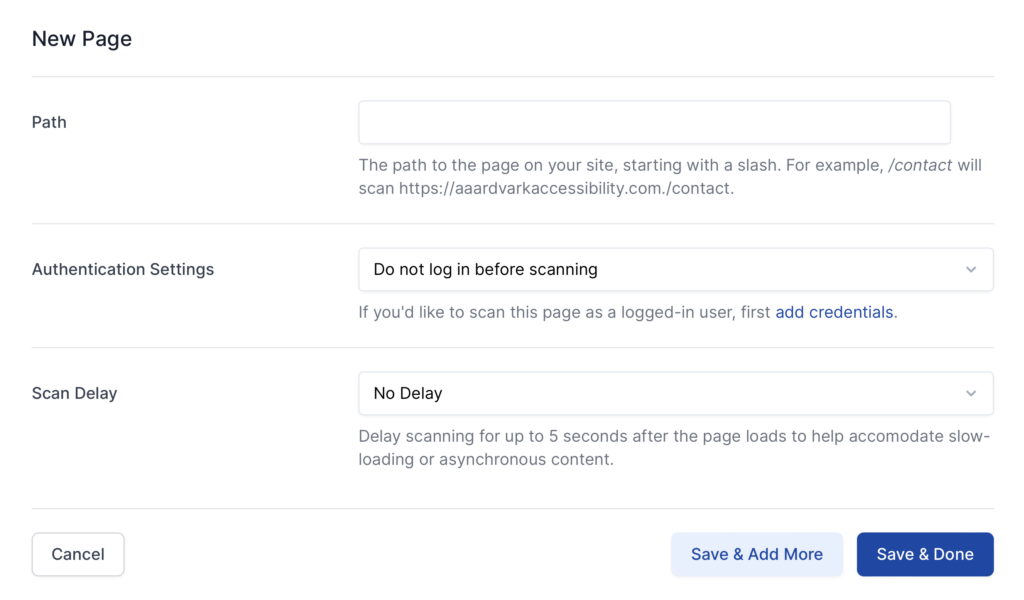
- In the New Page Editor, fill out:
- Page Path: Enter the URL path for the page.
- Authentication Settings: Indicate if logging in is required to view this page
- Scan Delay: Set a delay to handle slow-loading elements.
- Click Save & Add More to continue adding pages, or Save & Done to finish.
Add Pages in Visual Mode
Already exploring your site in Visual Mode? You can add pages to your site as you discover them; no need to jump back to the Pages table or upload a sitemap. This is handy for pages that aren’t in your sitemap, like content behind a login or pages you only find by clicking through the site.
- Open any added page in Visual Mode.
- Enable the Browse Site toggle.
- Click through your site until you reach a page you’d like to add.
- Turn on Show Page Info to confirm the current page path at the top of the screen.
- Click Add Page to add the current page to your site.
- Once added, click Scan Page to scan it right away, or continue browsing to add more pages.
Pages added this way appear in your Pages table just like pages added from a sitemap or manually, where you can filter, sort, and re-scan them at any time.
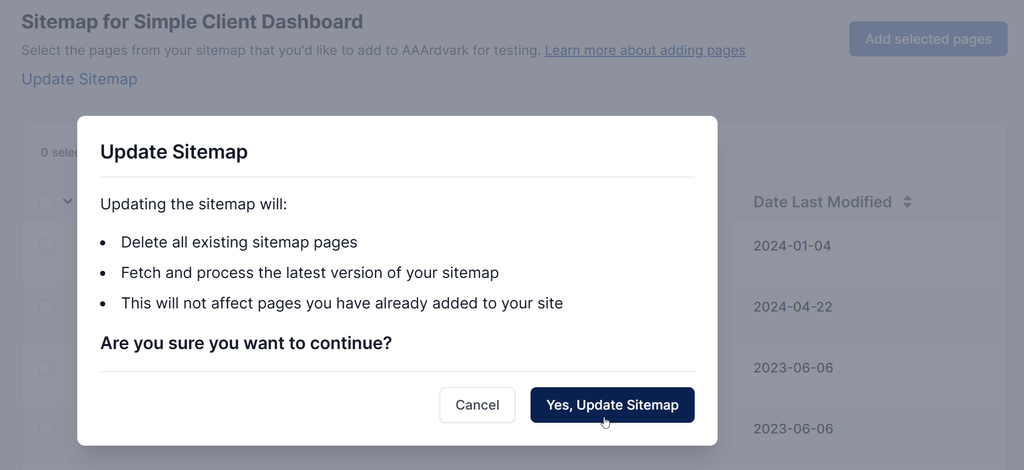
Updating Sitemap
When your site changes – pages removed, new pages added, etc. – your sitemap in AAArdvark won’t automatically reflect those changes.
To update the sitemap, head to Pages > Add Pages + > From Sitemap and click on the Update Sitemap option.

Updating the sitemap will:
- Delete all existing sitemap pages
- Fetch and process the latest version of your sitemap
- This will not affect pages you have already added to your site
To go ahead with the update, click on Yes, Update Sitemap. The new Sitemap will display updated pages that will load in the next step.
Running Scans on the Pages
Now that you have your pages added, you’re ready for the next step: Scans.
Follow along with our guide on Scanning.