

Understanding the Accessibility Testing Workflow
Introduction
Running a scan once and calling a site accessible misses most of what actually blocks someone from using it. AAArdvark’s testing workflow is built around three connected stages: Scan, Review, and Test, so you get a complete, honest picture instead of a false sense of “done.”
Why Three Stages
Automated tools are fast, but they only catch a fraction of real accessibility barriers, usually the ones that show up directly in code: missing alt text, low contrast, unlabeled form fields. They can’t tell you whether a focus order makes sense, whether alt text is actually meaningful, or whether someone using a screen reader can complete a checkout flow.
That’s why AAArdvark layers three stages on your site dashboard, and each one adds a different kind of confidence:
- Scan automatically checks every page against your chosen accessibility standard.
- Review brings in a human to confirm or dismiss the items a scanner flagged but couldn’t decide on its own.
- Test is a full manual audit, tracked page by page, for the things no automated tool can evaluate.
Each stage builds on the last. Jumping straight to Test without scanning first means redoing work a scanner would have caught instantly. Relying on Scan alone means missing the barriers that actually stop someone from using your site.
Stage 1: Scan (Automated)
Automated scans check every page on your site against your chosen accessibility standard and checker.
Scans reliably catch things like:
- Missing or unhelpful alt text
- Insufficient color contrast
- Unlabeled form fields
- Missing heading structure and landmarks
You can run scans on a schedule (daily, weekly, or manual only) or trigger one manually anytime from the Site Dashboard. See Automated Scans for how to set your frequency and run scans manually.
What scans can’t catch is anything that needs human judgment: whether an interaction actually works with a keyboard, whether alt text conveys the right meaning, or whether a workflow is genuinely usable with assistive technology. That gap is exactly what Review and Test are for.
Stage 2: Review (Needs a Human Eye)
Some things a scanner flags, it can’t fully decide on its own. These show up with a Needs confirmation status on their own dedicated screen separate from your main Issues list, and they need a person to confirm whether they’re real issues or not.
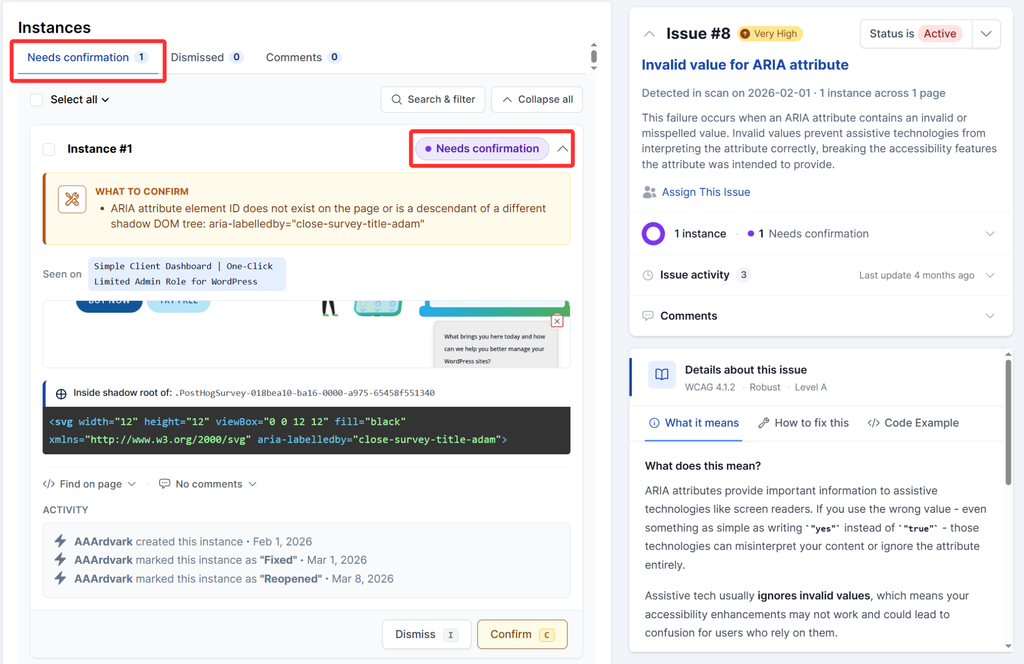
Reviewing one of these items means checking it and deciding: Confirm it as a real issue that needs fixing, or Dismiss it.
Who can do this: Workspace Owner, Administrator, Project Manager, and Accessibility Tester can act on Needs confirmation instances. Developers and Clients cannot. See Team Settings for the full breakdown of what each role can do.
Once you’ve worked through your Needs confirmation queue, see Fix and Manage Issues for how to filter, assign, and track issues day to day.
Stage 3: Test (Manual Audit)
Some barriers only show up when a real person tries to use the page: keyboard navigation, screen reader behavior, meaningful alt text, visible focus indicators. That’s what manual testing is for.
AAArdvark tracks manual testing per page on the Pages screen, using four statuses: Not Started, In Progress, Tested, and Skipped. Only Tested counts as complete.
You’ll do the actual testing in Visual Mode, directly on the page. For the full walkthrough, including assigning testers to pages and tracking audit progress, see Manual Testing Workflow.
How the Workflow Affects Your Accessibility Score
Your Accessibility Score reflects how far you’ve gone through all three stages, not just Scan. A site needs at least one completed scan before it gets a score at all – until then, you’ll see no grade rather than a placeholder number.
Automated scanning alone caps your score at a B. Resolving Review items improves your score, since it changes your underlying issue load. Reaching the top of the score range takes two things: completing manual testing and fixing issues that were found in automated and manual testing.
You don’t have to manually test every page to get there. Focus on important pages, samples of repeated templates, and high-priority content to create your manual testing sample.
Marking a page Skipped lets you finish your testing plan, but skipped pages don’t count toward your tested sample, so skipping pages on their own won’t unlock the top of your score range.
If your site has PDFs, unresolved PDF accessibility issues can also cap your score.
A good score means you’ve done thorough, layered testing. It’s not the same thing as a guarantee that your site is fully accessible to everyone.
Reading the Workflow on Your Dashboard
Your Site Dashboard surfaces the output of all three stages in one place.
The Recent Activity feed logs every scan run – your record of the Scan stage.
While Site Statistics shows the active issues and severity breakdown that emerge from Review.
The Count History chart tracks how that issue count moves over time as you work through each stage.
When you’re ready to act, Run Automated Scan and Start Manual Audit are both available directly from the dashboard, so you can pick up whichever stage needs attention next.